Cookies

Be aware our website uses cookies to give you the most relevant experience by remembering preferences and repeat visits. By clicking “Accept”, you consent to the use of ALL cookies. At any time, you may visit Cookie Settings to review your settings and provide controlled consent.

Thank you! Your submission has been received!
Oops! Something went wrong while submitting the form.

Privacy Overview

This website uses cookies to improve your experience and for better navigation of the website. Out of these cookies, those that are categorized as necessary are stored on your browser. These necessary cookies are essential for the basic functionalities of the website. We also use third-party cookies to help us analyze and understand how you use this website. All cookies necessary will be stored in your browser only with your consent. You may also choose to opt-out of these cookies, but opting out of some might have an effect on your browsing experience.

+
Functional

All necessary cookies are essential for proper functionality of the website. This category includes only cookies which ensure basic functionalities and security features. These cookies do not store any personal information.

Always enabled
+
Marketing cookies

By accepting the use of cookies for the purpose of marketing, you consent to the processing of your information regarding your use of our website for Google Ads. In this way, Google can display relevant PhotoRobot ads during your internet browsing. You may choose to opt-out of cookies for the purpose of marketing at any time by changing your Cookie Settings.

+
Analytics

Analytical cookies are in use to understand how visitors interact with the website. These cookies help to provide us information on the number of visitors, bounce rate, traffic source, etc.

Save & Accept
Thank you! Your submission has been received!
Oops! Something went wrong while submitting the form.
Get in touch

Capturing Images with PhotoRobot Systems

After creating a Workspace in the PhotoRobot Controls App (further referred to as “CAPP”), the Capture interface grants user control over PhotoRobot hardware and cameras to automate image and video capture. 

Capture interface

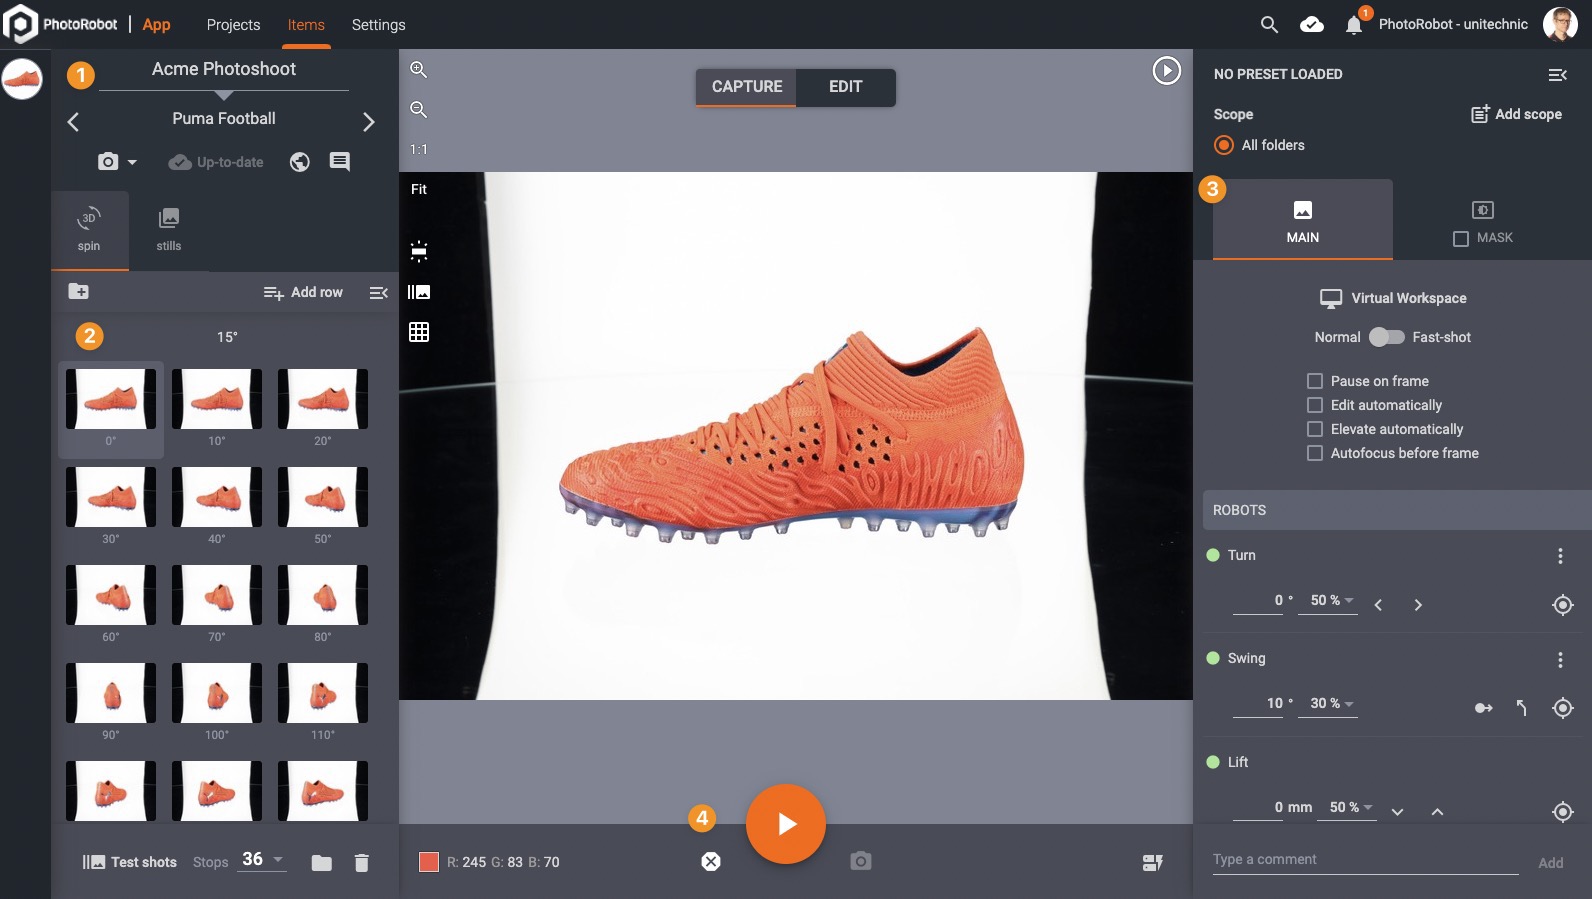
The CAAP Capture interface consists of 4 main areas:

Image capture software user interface

  1. Item information
  2. Folders, frames and images
  3. Hardware configuration
  4. Sequence control

Item information

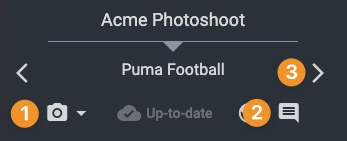
This section of the CAPP Capture interface provides basic information about the item.

Photoshoot item general information

  1. Capture status - Toggle item status to Captured, Edited, Recapture, or Fix Editing
  2. Comments - Click to access all item-level comments
  3. Next / Previous - Use to navigate between items according to selected item status filter

( * ) - Set Item Status Filter to limit results to quickly find and navigate projects.

Item list status filter for easy navigation

  • Filter results to display only items marked: Captured, Edited, Verified, Approved, or Rejected.

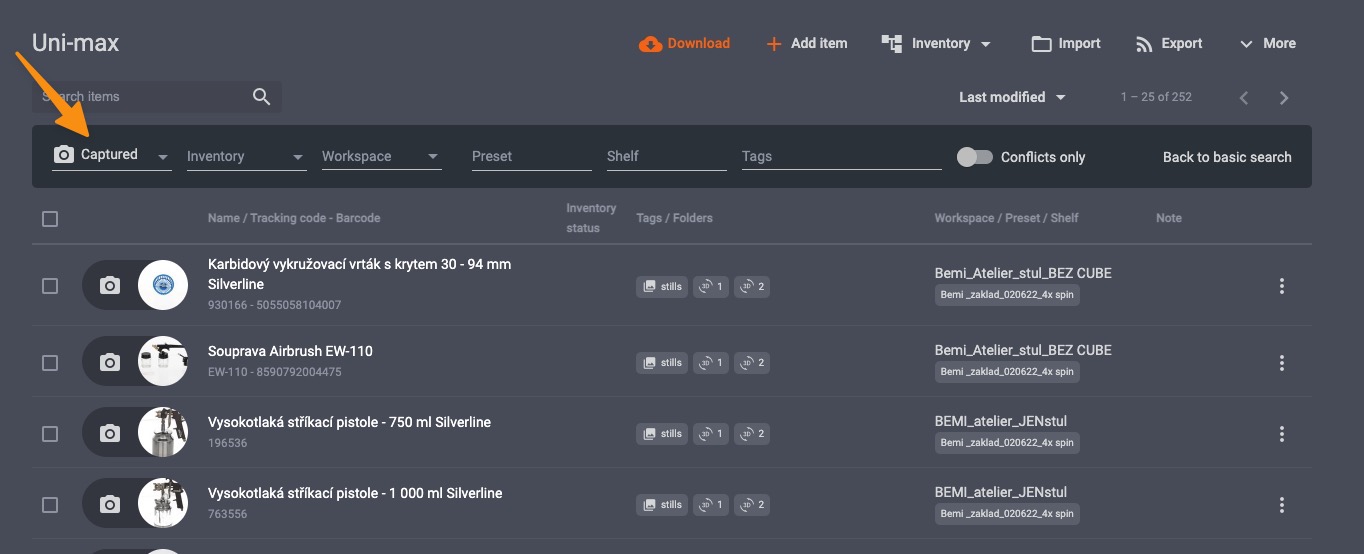
For example, if responsible for verifying images, limit results to “Edited” to locate & review only items that have already been post-processed. After review, set item status to “Verified” or to “Fix Editing” to approve or reject changes and notify team members. The item status will inform responsible parties when images are ready for publishing, or when more editing is necessary.

Folders, frames & images

All visual assets are organized into Folders, with folders divided to represent different types of outputs. The three types of folders are:  

  1. Spin (360 / 3D)
  2. Stills
  3. Video

Each Folder contains individual frames. A frame consists of information about the photographed angle (instructions for photographic processes), and one or two versions of the image:

  • Original - The original file as received by the camera
  • Edited - The image file which has been edited via PhotoRobot’s post-processing tools

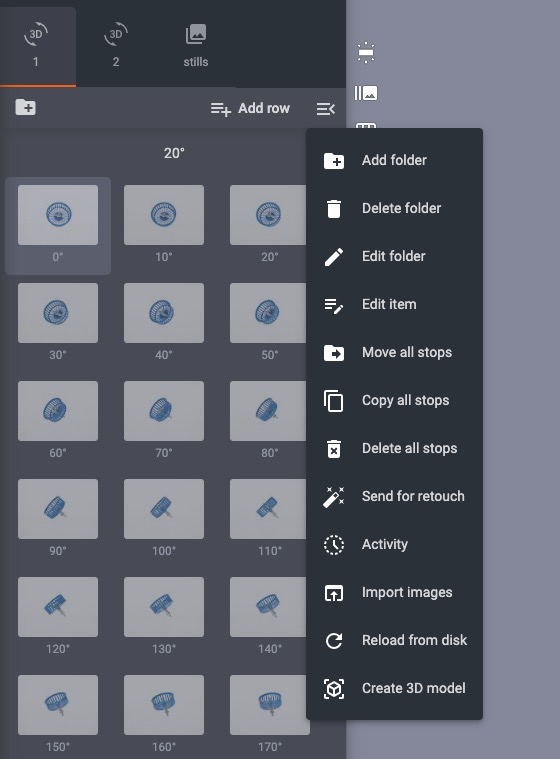
Navigate the Folder interface as follows:

Item image folder interface

  • Select between folders (1)
  • Experiment with configurations by taking Test shots (2)
  • Open image storage on a local computer computer (3)
  • Clear photos for re-capturing (4)
  • Access folder menu* (5)

*The Folder menu includes:

Image folder menu options

  • Add / Delete / Edit folder
  • Copy / Move frames between folders
  • Delete frames - completely remove all frames together with all images and angle configurations
  • Send for retouch - mark item for external retouching
  • Activity - view the activity log of an item
  • Import images - upload your own images
  • Create 3D model - generate a 3D model from images contained in the folder (*Available only on MacOS)

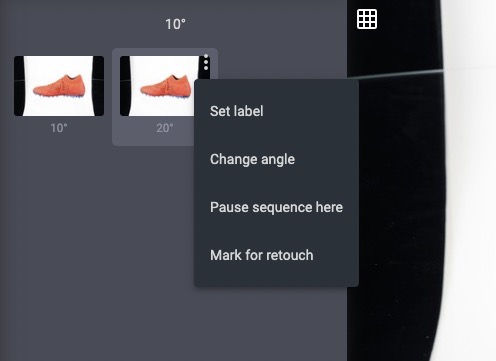
Also, within each frame there are additional menu options:

Item folder individual frame options

  • Set label - Create labels for individual frames (e.g. “hero shot - front”, “3 / 4”, “back”, or GS1 image naming conventions)
  • Change angle - Adjust angle on an individual frame
  • Pause sequence here - Select to pause the photography sequence at this frame and wait for an operator to resume the shoot
  • Mark for retouch - Specify image for external, 3rd party retouching

Sequence control

To start a sequence, press the Play button (1) at the bottom of the screen:

Image capture sequence control interface

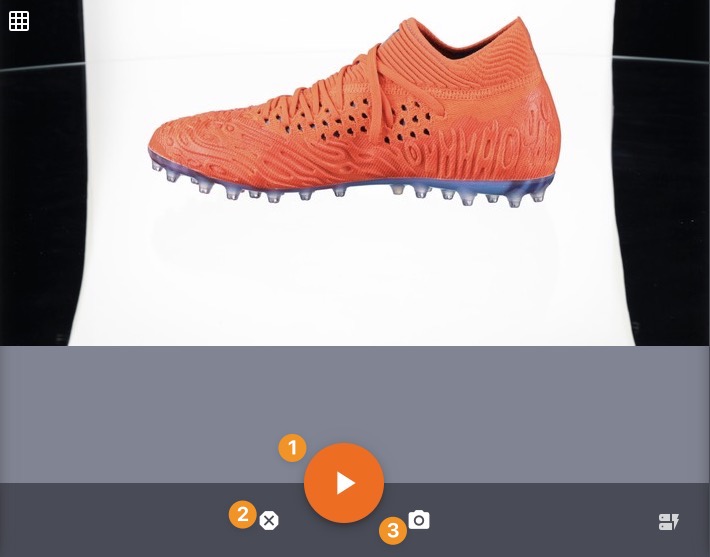
Interrupt a sequence at any time via the Emergency stop button (2). 

In a stills folder use the Take snapshot button (3) to capture a frame without defining it first. The snapshot will then be captured and included as a new frame in the stills folder.

Sequence options

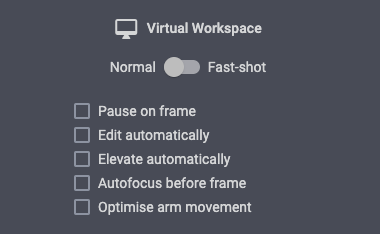
Along the right hand-side panel of the CAPP interface, configure sequence options. Sequence options include:

  • Workspace configuration - Access workspaces or change between each
  • Normal vs Fast-shot toggle - Configure to pause turntable rotation before taking photos (Normal), or, for significantly quicker sequences, to take photos during non-stop rotation (Fast-shot)
  • Pause on frame - Toggle on to command turntable rotation to stop after each frame (useful when creating product animations)
  • Edit automatically - Configure to automate editing immediately after capture
  • Elevate automatically - Enable for automatic elevation to the center of a product before beginning a sequence (using item dimensions)
  • Optimise arm movement - after the sequence, the arm will remain in the position of the last photographed row. The following sequence will start from this position.

Spin

In a Spin folder, find options for 360-degree product photos.

360 spin folder interface options

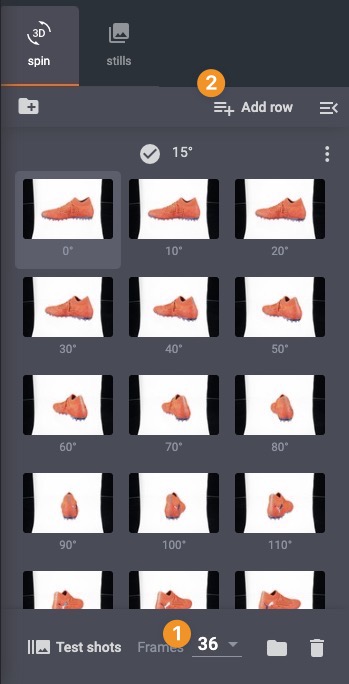
Configure Frames (1) to select the number of frames to capture per rotation (e.g. 24, 36, etc). Use Add row (2) to specify capture of additional rows from a different swing angle (the vertical angle from which the camera points at the object).

Stills

To define which frames to capture in a stills folder, use Add frame in the top right-hand corner of the interface.

Still image folder add frame

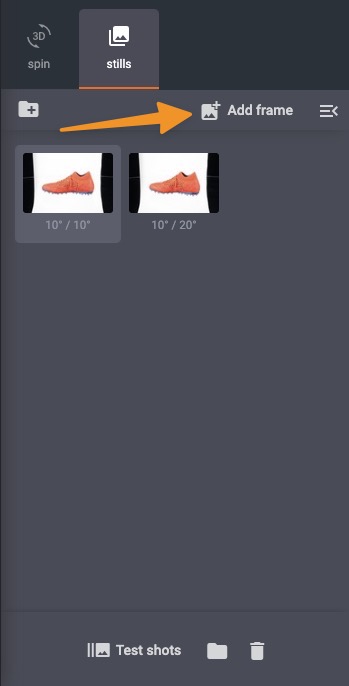
Alternatively, press Take snapshot to simultaneously take a photo and create a new, corresponding frame. Connect a camera over WiFi to take photos by hand and automatically add new frames (close-ups, detail shots) to the stills folder.

Freemask background removal

Freemask background removal is a process in which two images are captured for each frame: 

  • Main image - a standard photo of the object
  • Mask image - a photo of the object lit from behind

Freemask main image
Freemask main image

Freemask background removal mask image
Freemask mask image

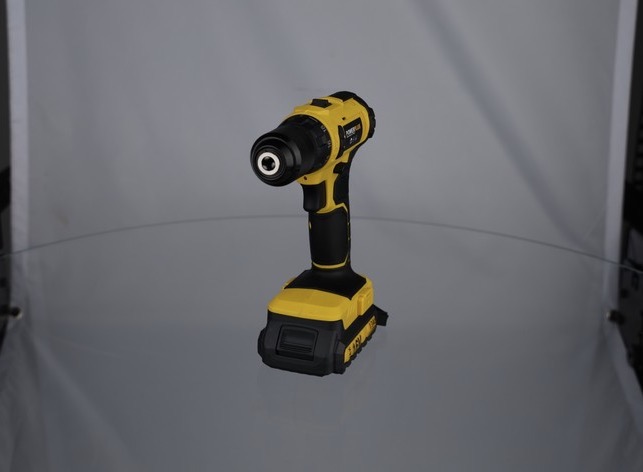
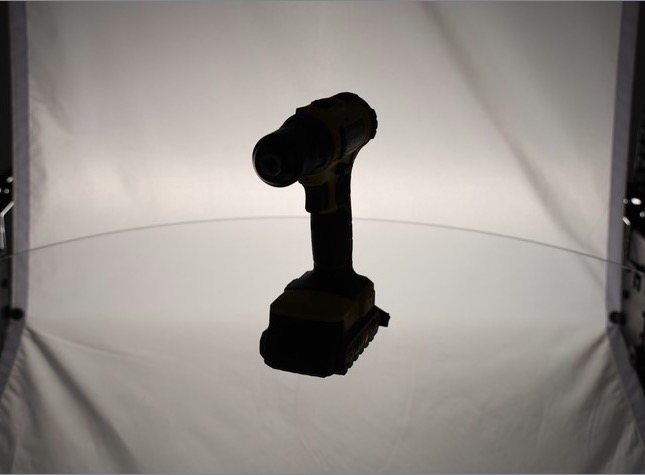
These two images are then composited to achieve a photo with the background effectively removed around the object:

Freemask transparent background product image
Resulting transparent background product photo

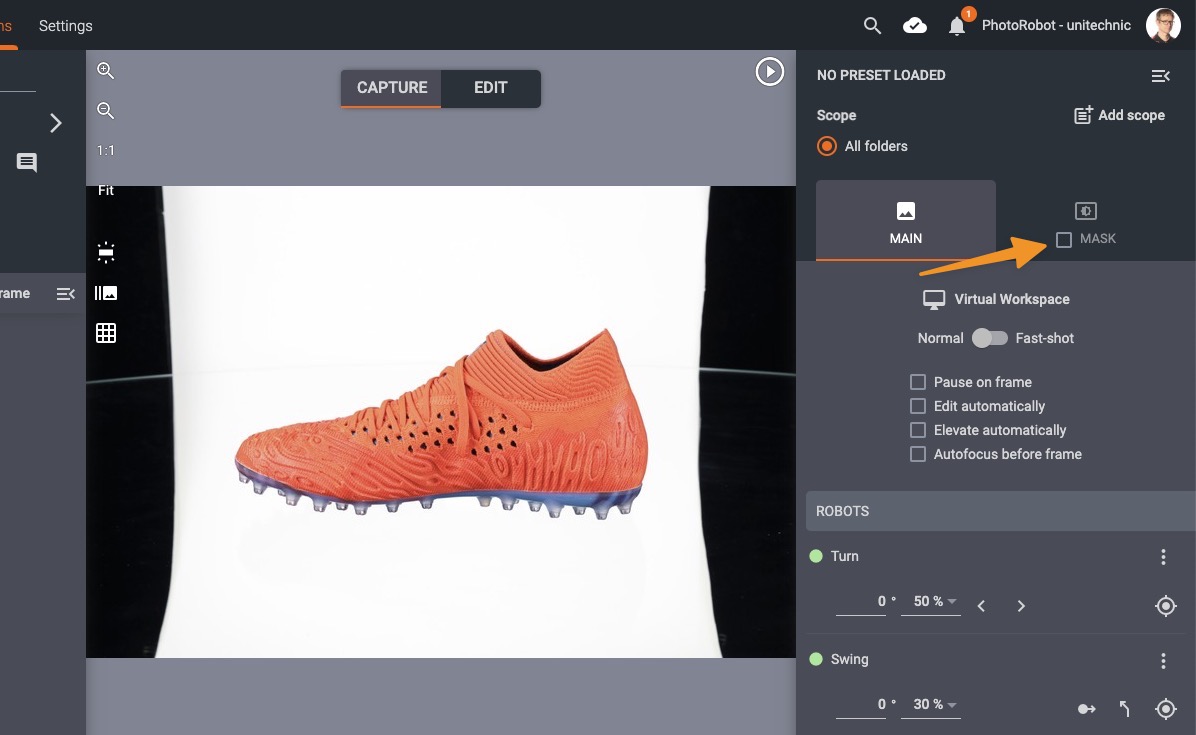
To enable Freemask, select the Mask checkbox on the right hand side panel:

Enable Freemask background removal

Hardware configuration

Robots

Depending on the robot (or combination of robots), there are up to 3 types of robotic movements:

Photorobot hardware configuration interface

  • Turn - Standard to the majority of PhotoRobot devices, Turn enables users to control turntable rotation around its center
  • Swing - Configure the vertical angle at which the camera targets an object (i.e. at 0° to remain level with the turntable, at 90° for a top-view overlooking the product)
  • Lift - Set camera elevation

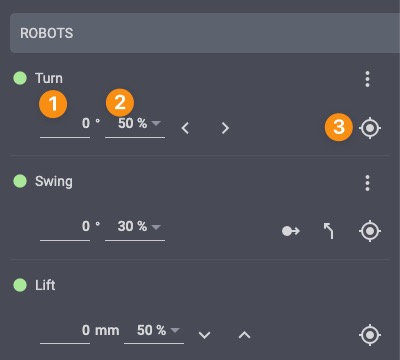
Use Set Position status (1) to move the robot. Configure speed of the movement using Speed input (2). Use the Calibration button (3) to set the robot to its starting position. 

( ! ) - If configuring movement for the first time, always set the robot to its initial position via Calibration.

Cameras

Enable one or multiple cameras for a sequence via the Cameras interface:

Camera configuration interface

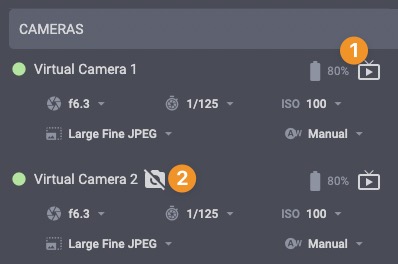
Click on the Live View icon (1) to enable focus point selection via clicking in a Live View picture. Exclude cameras from the sequence via the Exclude camera icon (2). Any excluded camera will not trigger during the sequence. Typically, this is useful when users have an extra camera connected over WiFi to take photos by hand alongside a predefined spin and stills.

( ! ) - See the PhotoRobot support manual on Camera Configuration for more information.

Lights

CAPP supports both strobe lights (Broncolor or FOMEI), and any LED lights with DMX support. For instructions on how to install & configure lights in CAPP, see the PhotoRobot manual on setting up a workspace.

Lighting setup - configuration & control

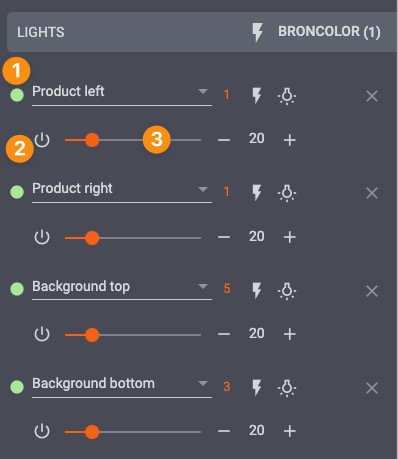
In the CAPP Lights interface, assign individual lights a position via the Light position menu (1). Using the drop-down menu, select either a custom position, or one of the predefined positions. Predefined positions include:

  • Product left / Product right – Lights positioned to illuminate the product from the front
  • Background top / Background bottom - Lights to illuminate the background from behind for creating a white background

To define a custom position, select Custom position from Position list options.

Switch lights on or off via the Power button (2). This is useful for example for a freemask approach, in which it is necessary to switch off front lights to take the mask image.

Move the Light intensity slider (3) from left to right for darker or lighter illumination. Note: Some DMX-controlled lights also provide control over color temperature.

Scopes & presets

By default, hardware configuration is the same across all folders within an item. 

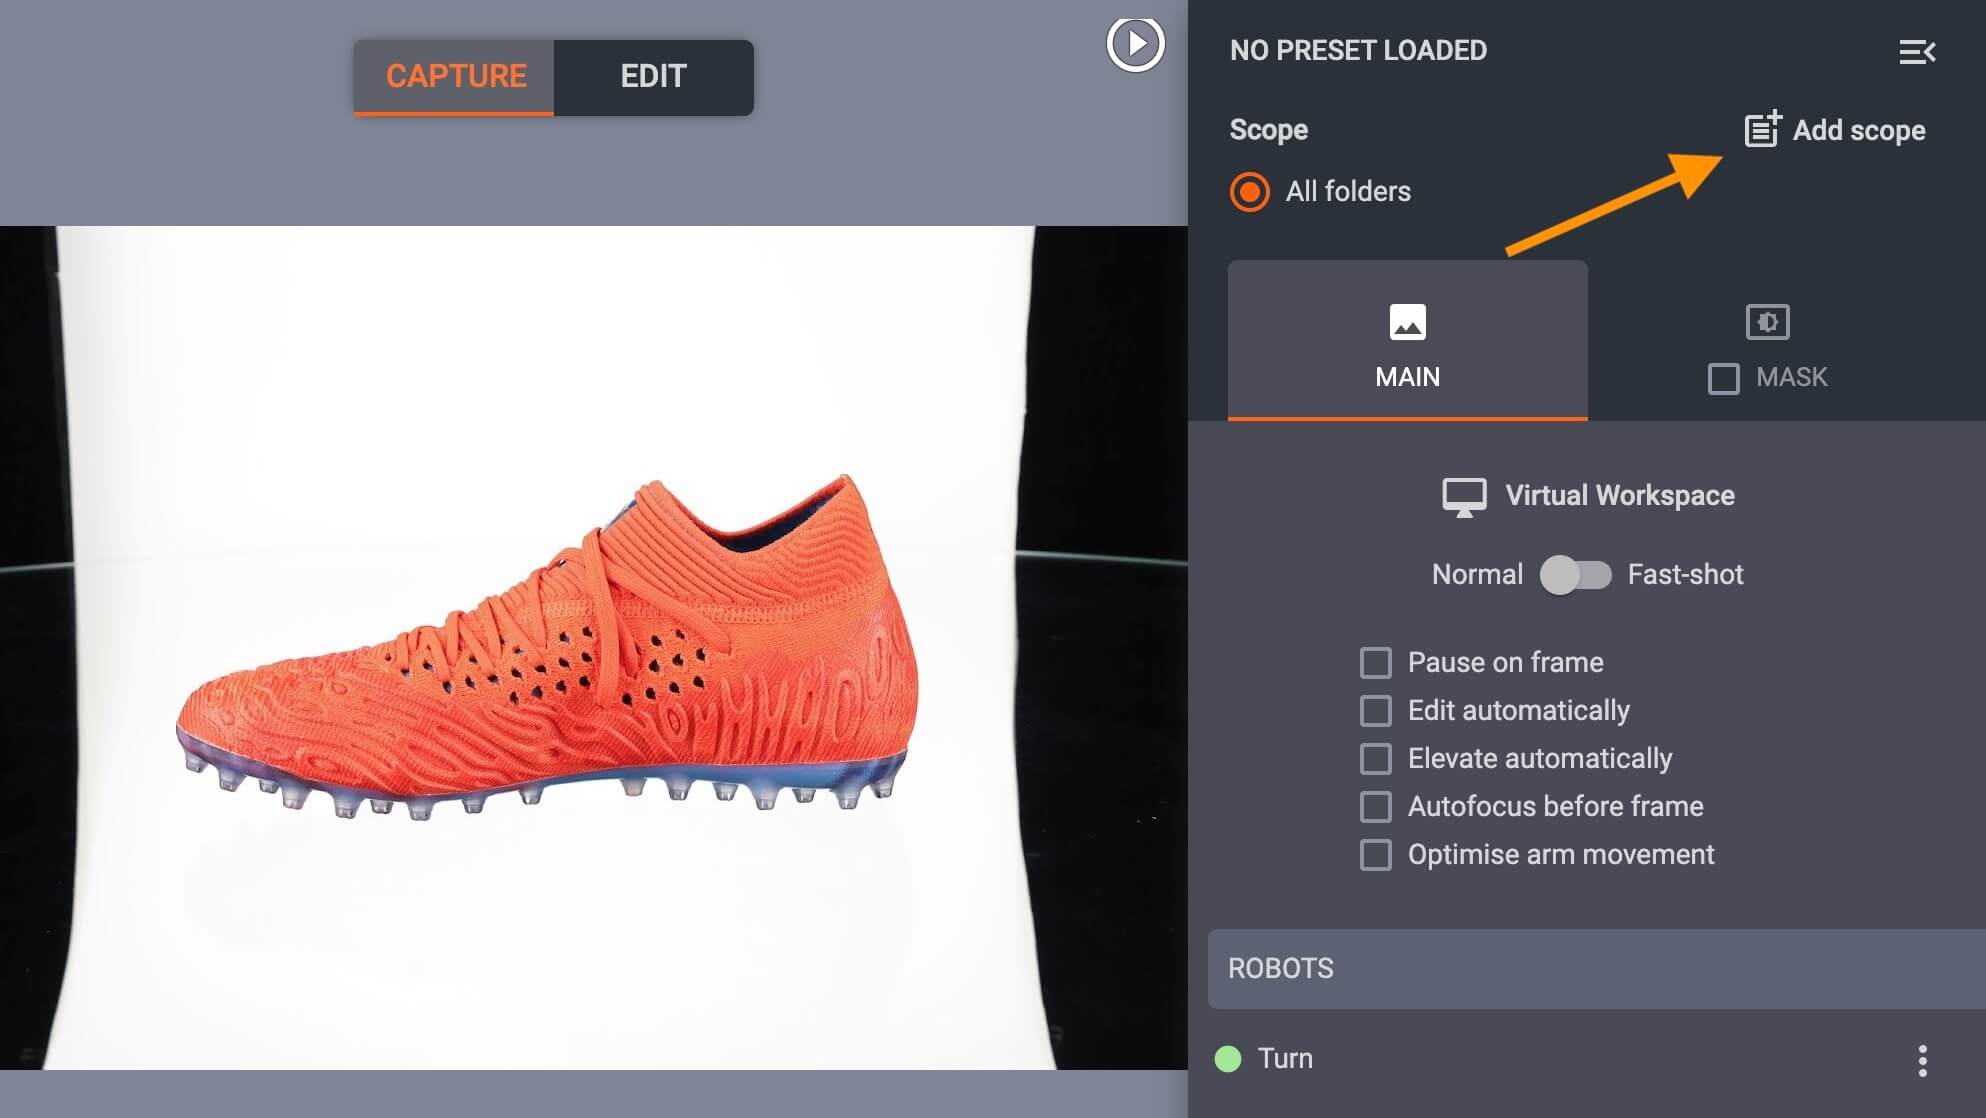
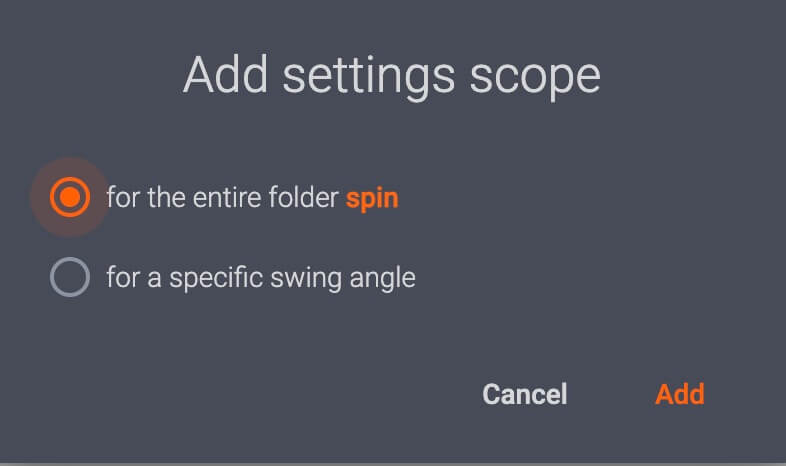
To customize a hardware setup (by folder or by row), use the Add scope button:

Capture software add settings scopes

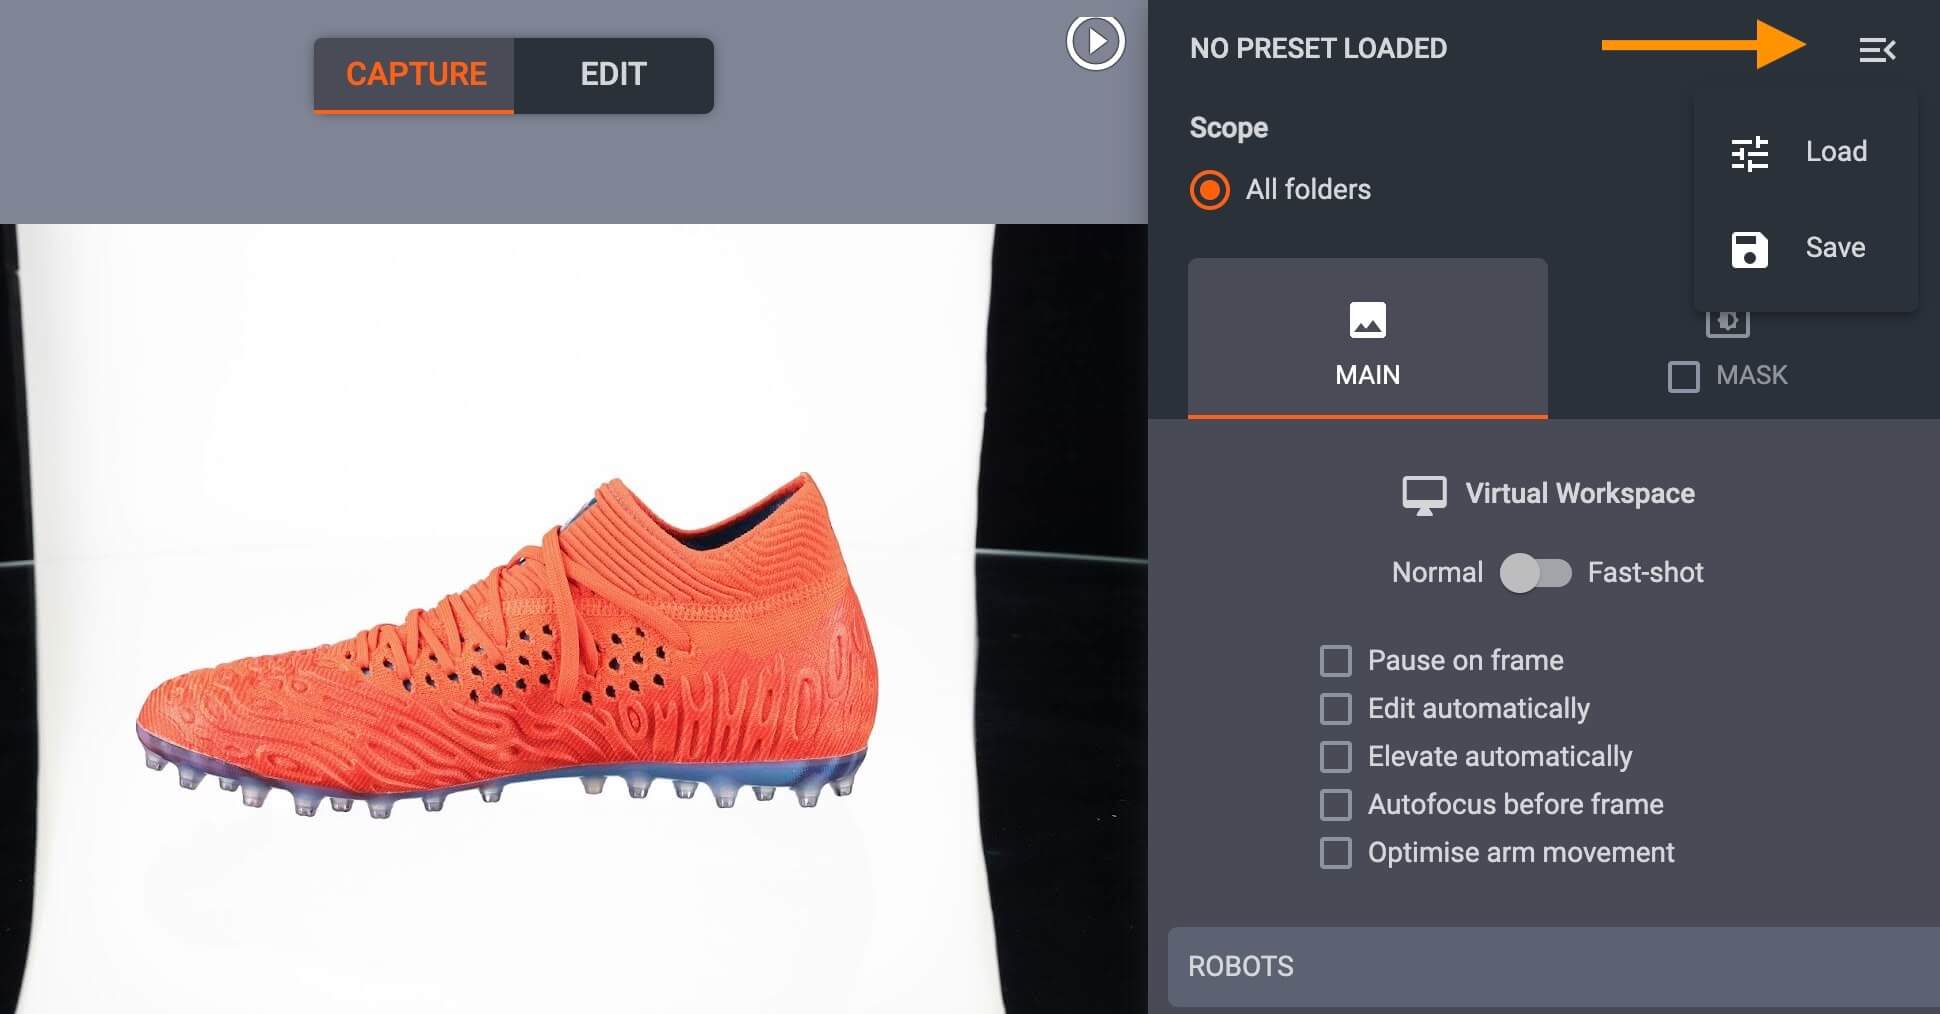
After customizing a configuration, load or save settings in the upper, right-hand corner via the drop-down menu for Presets:

Save and load PhotoRobot presets

  • Click the file icon to save all capture settings, and later load configurations to reuse across similar photoshoots.

Assign presets

In CAPP, there are 3 methods to load / assign Presets for an item or multiple items. 

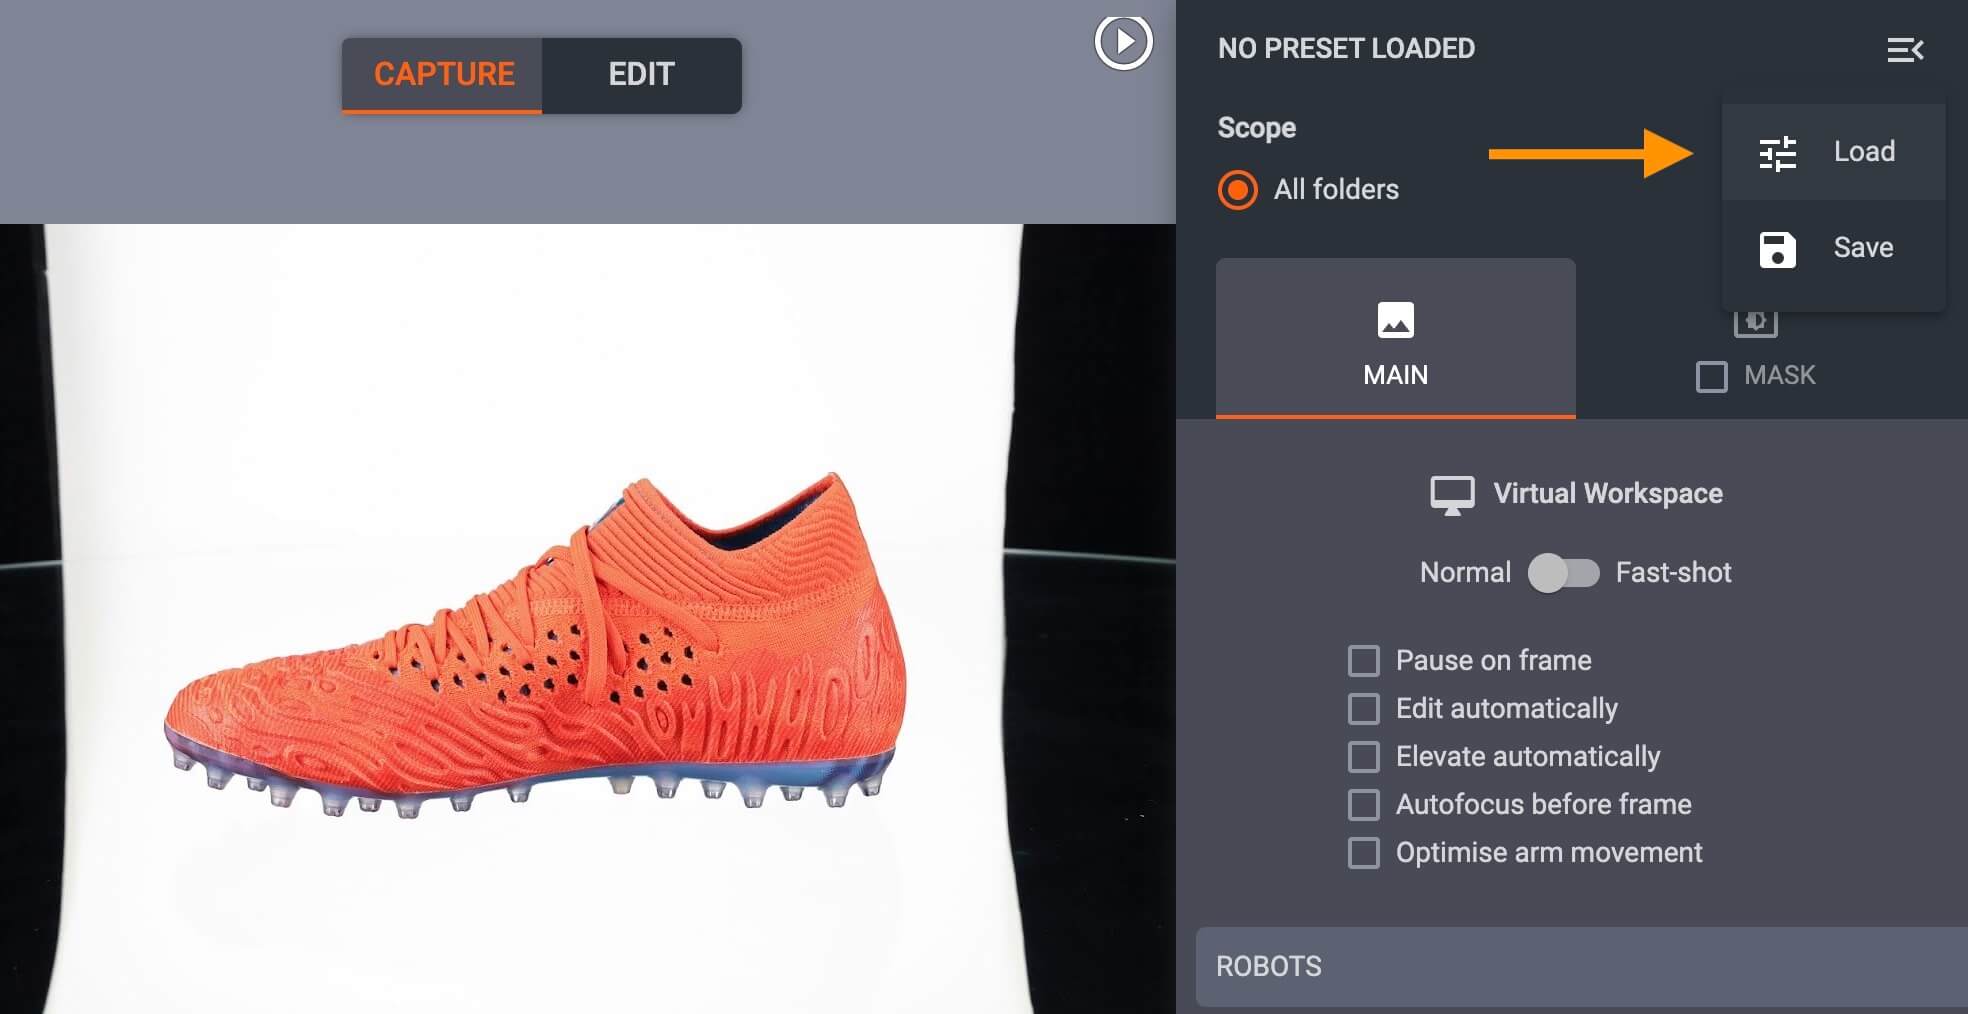
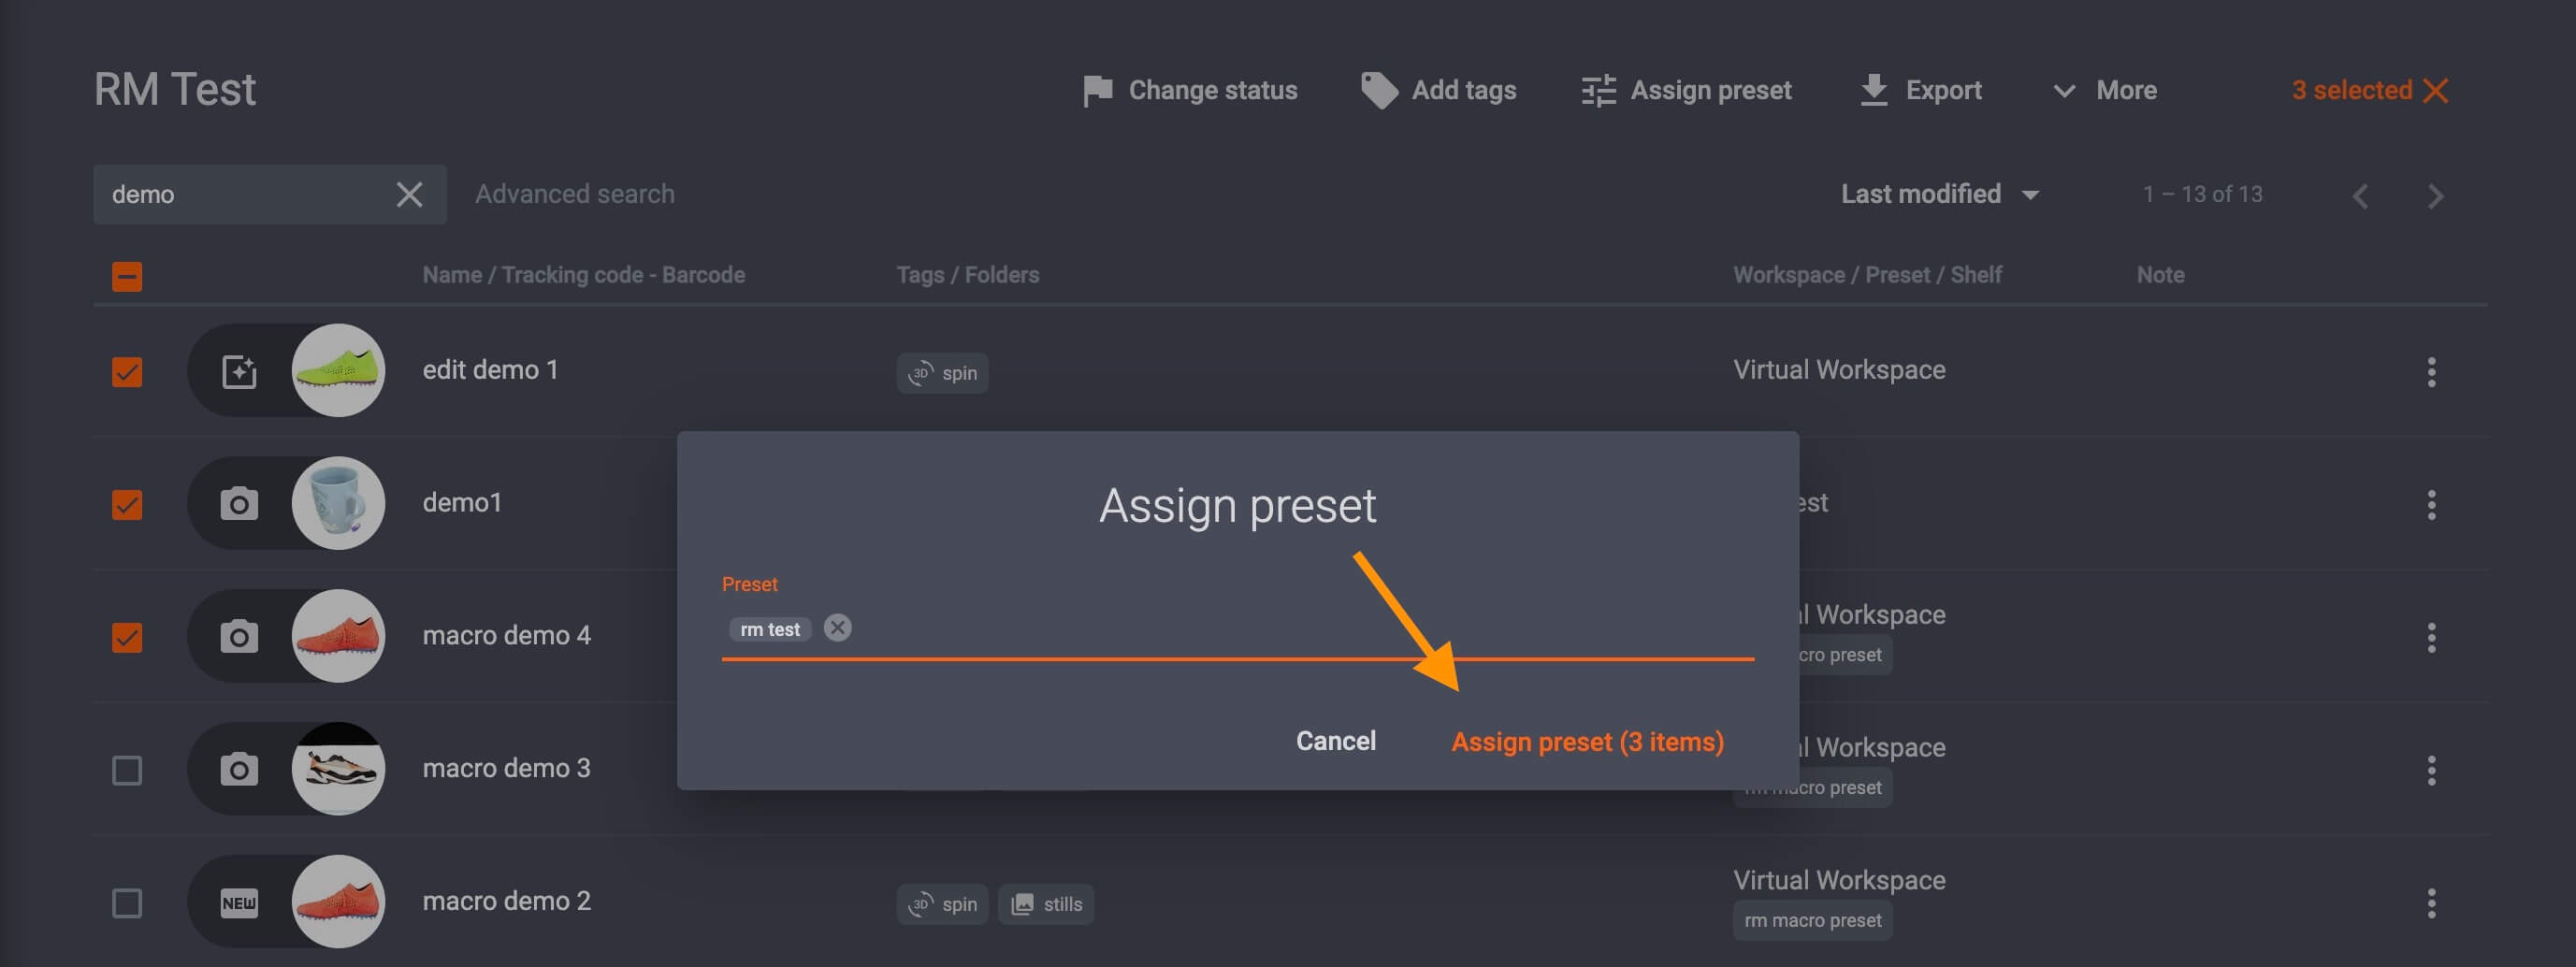
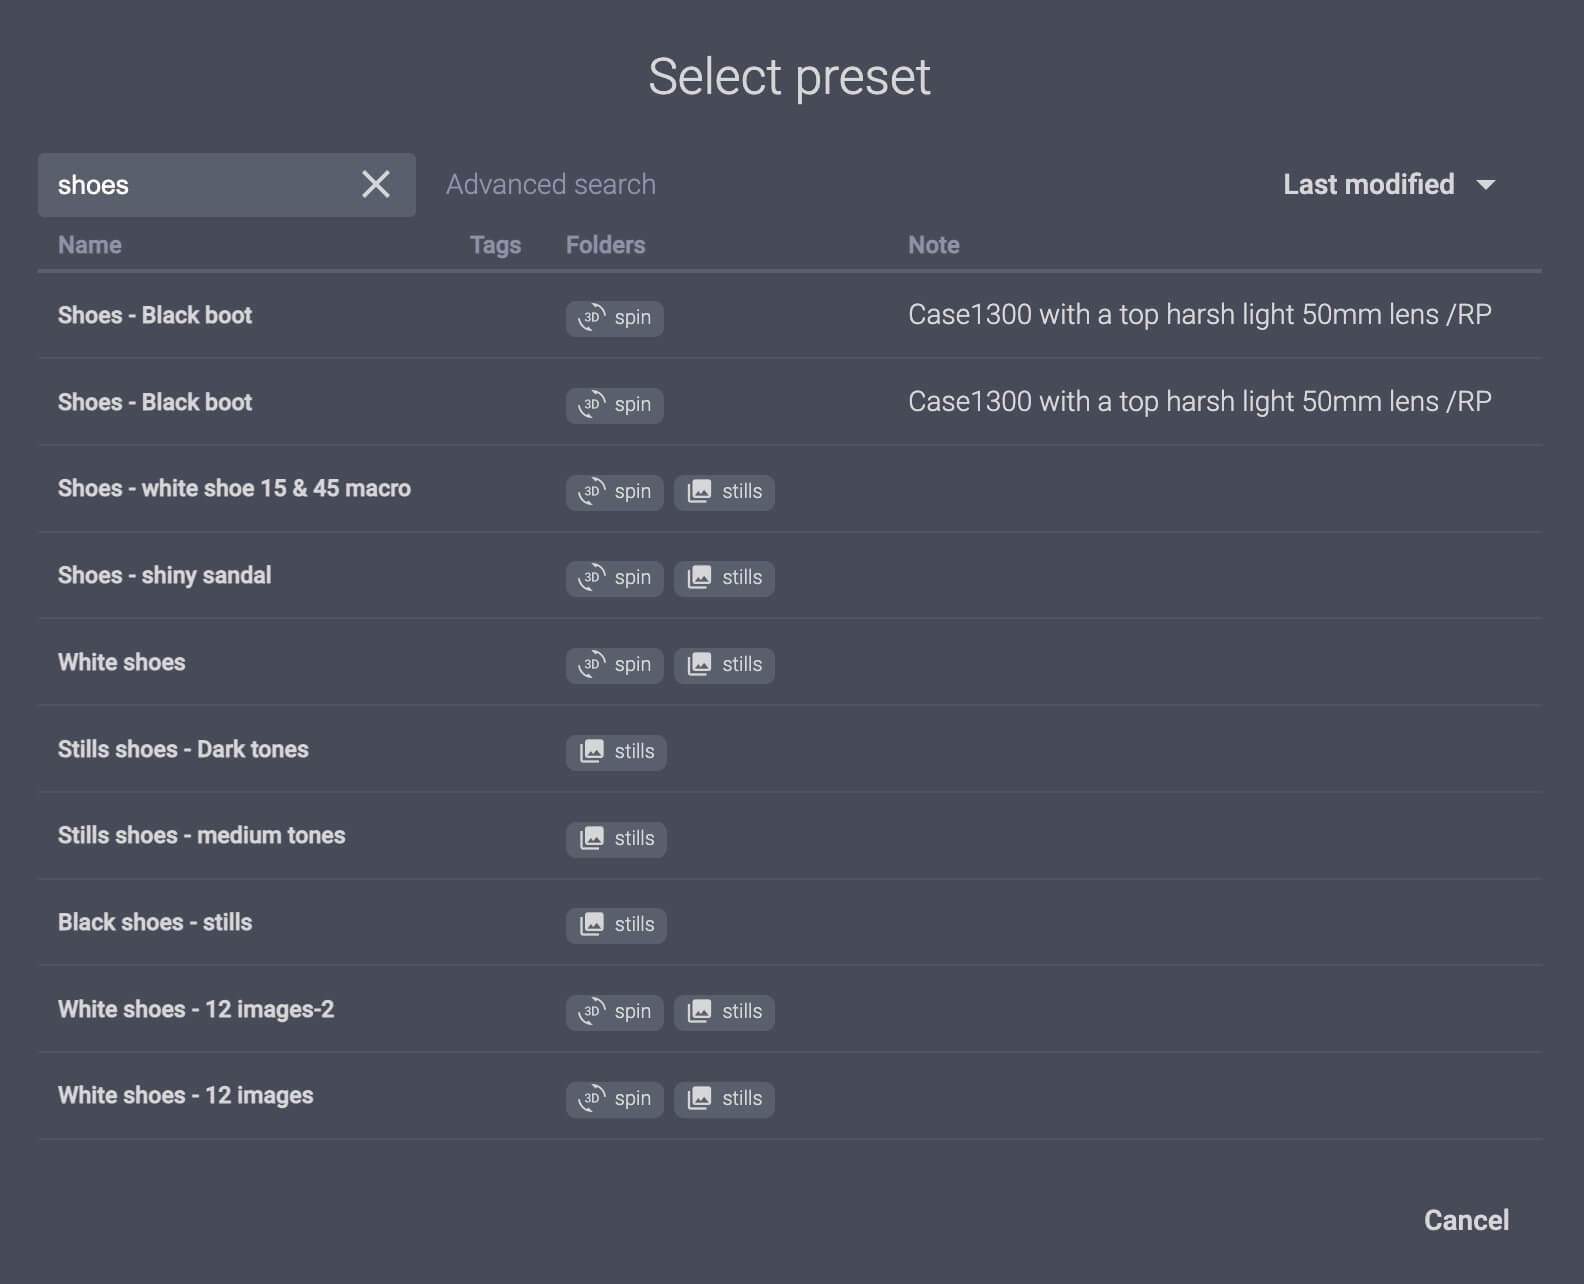
1. Select an item, and load a Preset via the drop-down menu icon in the upper-right part of the interface:

Load software capture presets

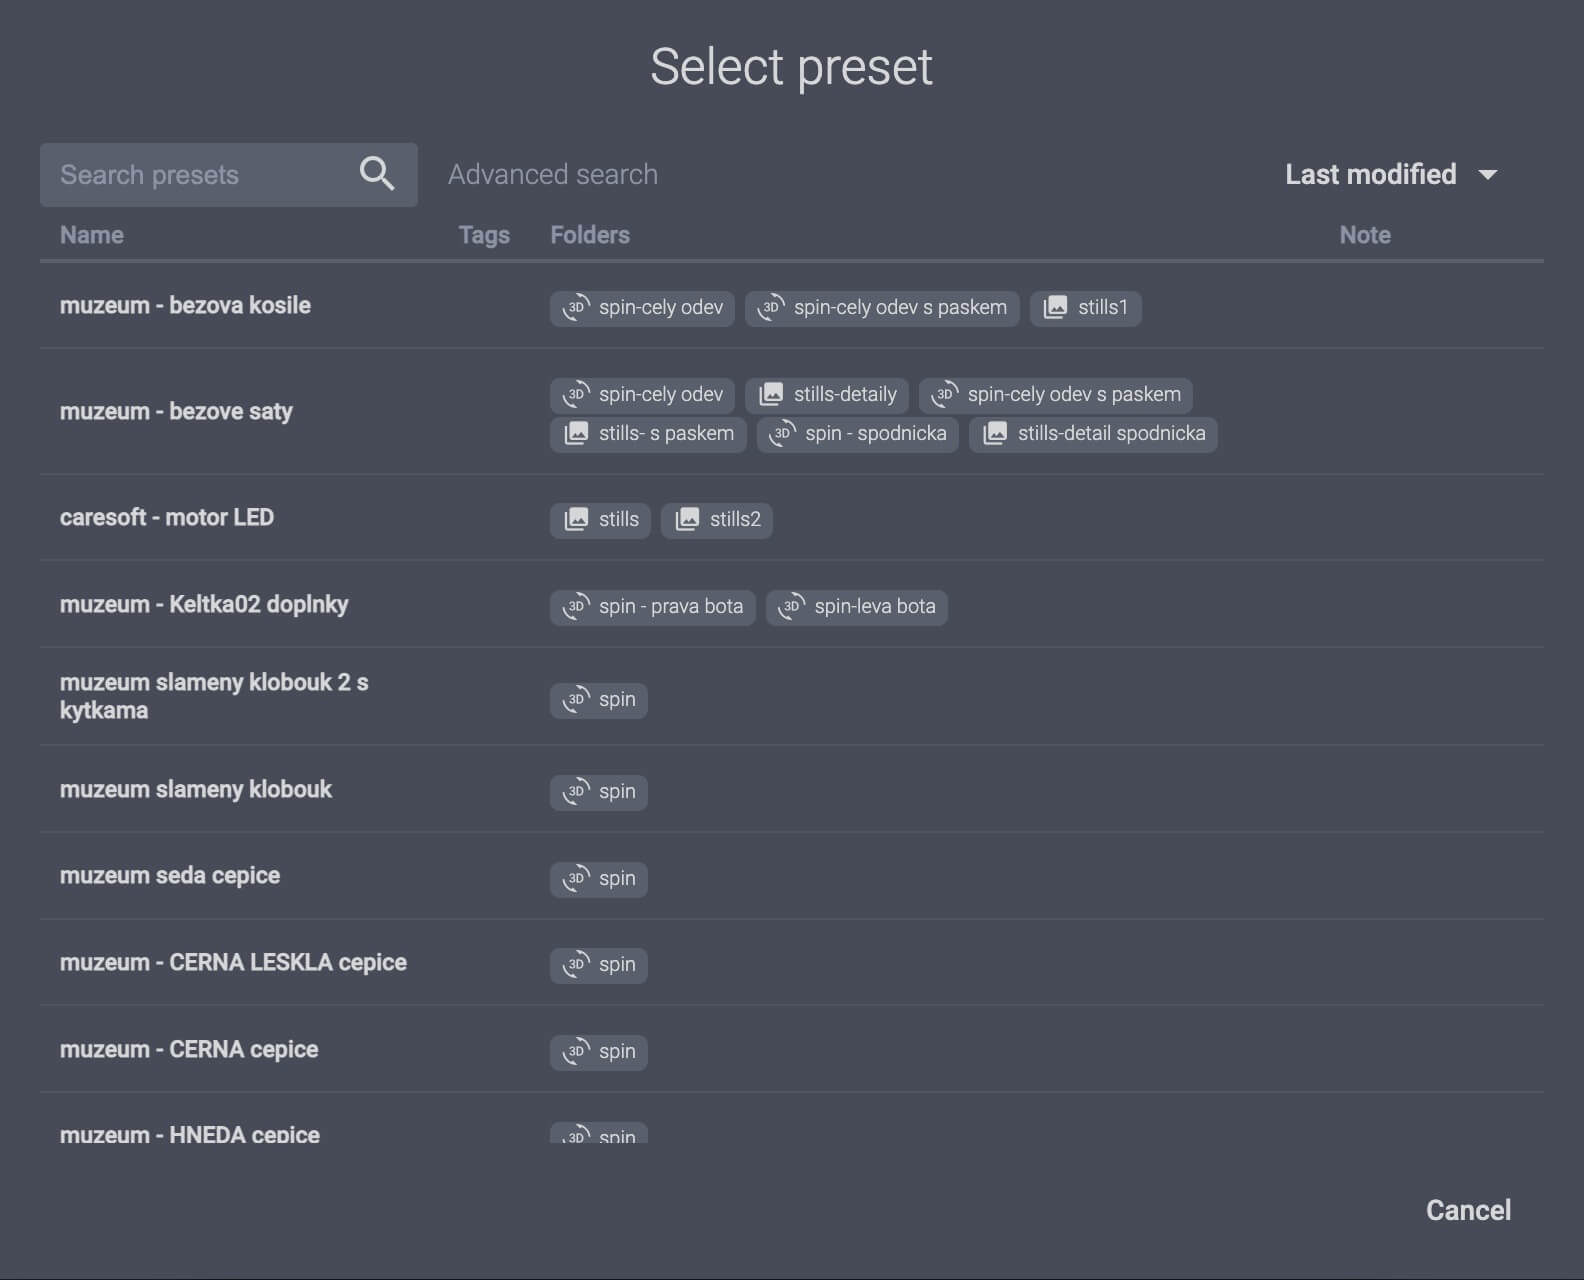
( * ) - Alternatively, use the hot key “P” to open saved Presets. Then, select a configuration to apply to the item. This will create folders for the frames that will be shot, along with all capture settings and predefined editing operations.

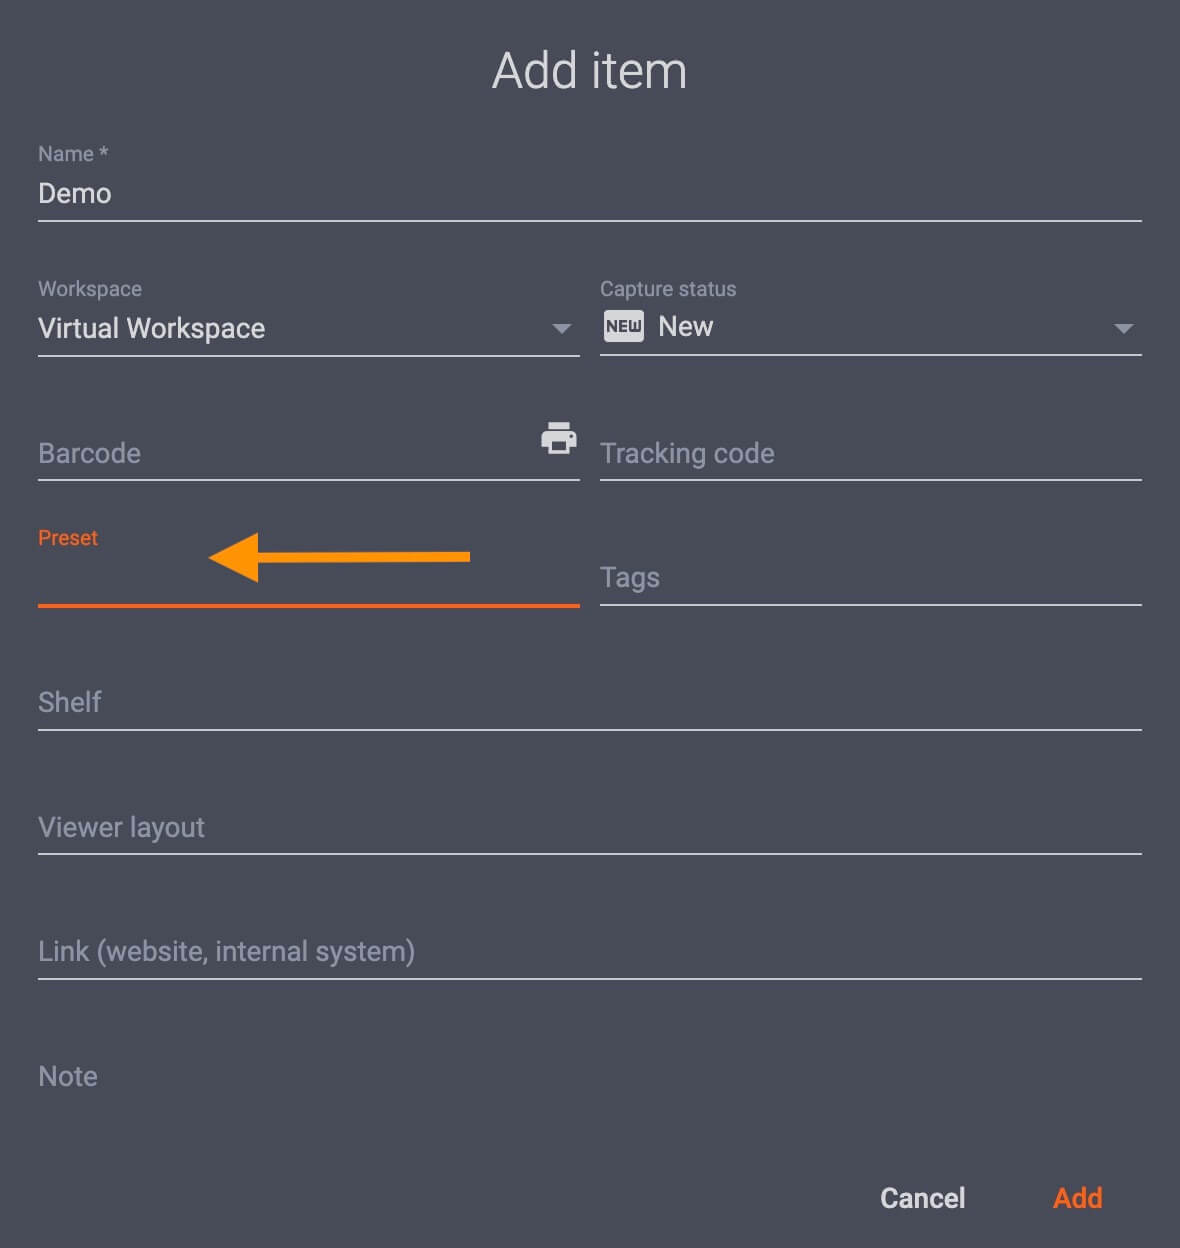
2. When creating an item, users can select a configuration via the Add item menu by clicking on the Preset field:

Item preset configuration
Software preset selection screen

  • To assign a Preset to multiple items, select the items from the Items menu, and click Assign preset:

Assign software preset multiple items

  • Select the preset by name, and assign it to the items by clicking Assign preset again:

Confirm assigned presets

3. Alternatively, in the Items menu, click Import to import items from CSV:

import presets via csv

  • CSV import functionality enables PhotoRobot users to create an item with its configurations in Excel to import into the system.
  • CSV files may contain the following customizable columns, and one functions to assign a preset by preset name to the item:

PhotoRobot CSV import

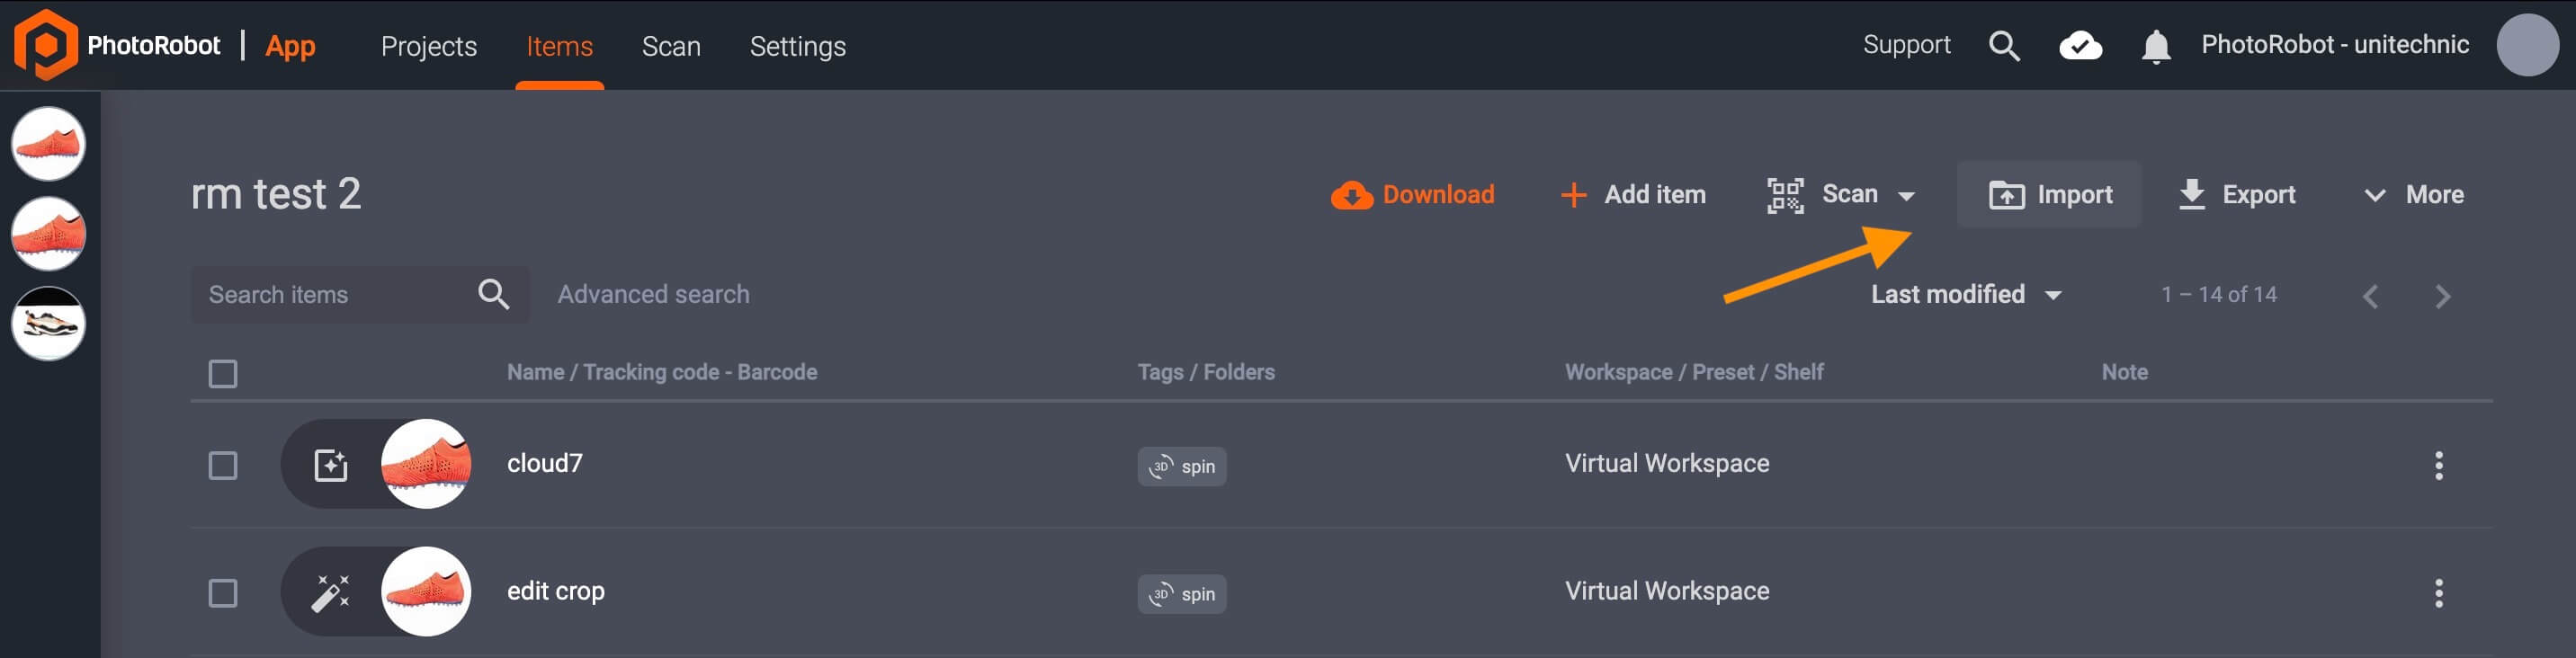
( ! ) - Note: When using CSV import, UTF-8 encoding is recommended for the best results.

Add settings scope operations

Primarily, configuring settings scopes instructs the system which folders to save captured images into, which frames to capture, and settings for the capture process. Scope settings also include sequence configuration (normal vs fast-shot mode), robot speeds, camera settings, light controls, and predefined editing operations.

Before shooting an item, users create or assign Presets in the system. The settings of the Preset can apply across an entire folder, specific items, or on individual rows and frames (in edit mode).

Configure settings scope entire folder

  • Select settings scopes for the entire folder spin, for a specific swing angle, or for current image only (edit mode only).
  • Each setting scope contains hardware configuration, capture settings, and one or more editing operations.

Add settings scope for specific swing angle

If applying scope settings for a specific swing angle, specify the angle on which the capture Presets will apply (e.g. 15°, 45°, etc):

Configure settings scope specific swing angle

  • Settings scopes can apply to one or more swing angles via Select swing angle. Specify the swing angle, and click Add to assign scope settings to a folder. 
  • The target folder with its assigned Presets will then display in the top-right part of the interface:

Configure multiple angle settings scope

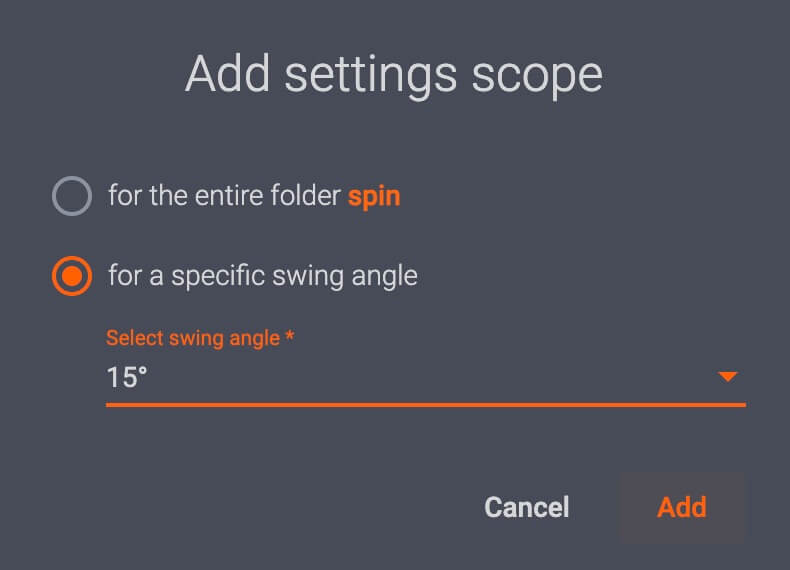
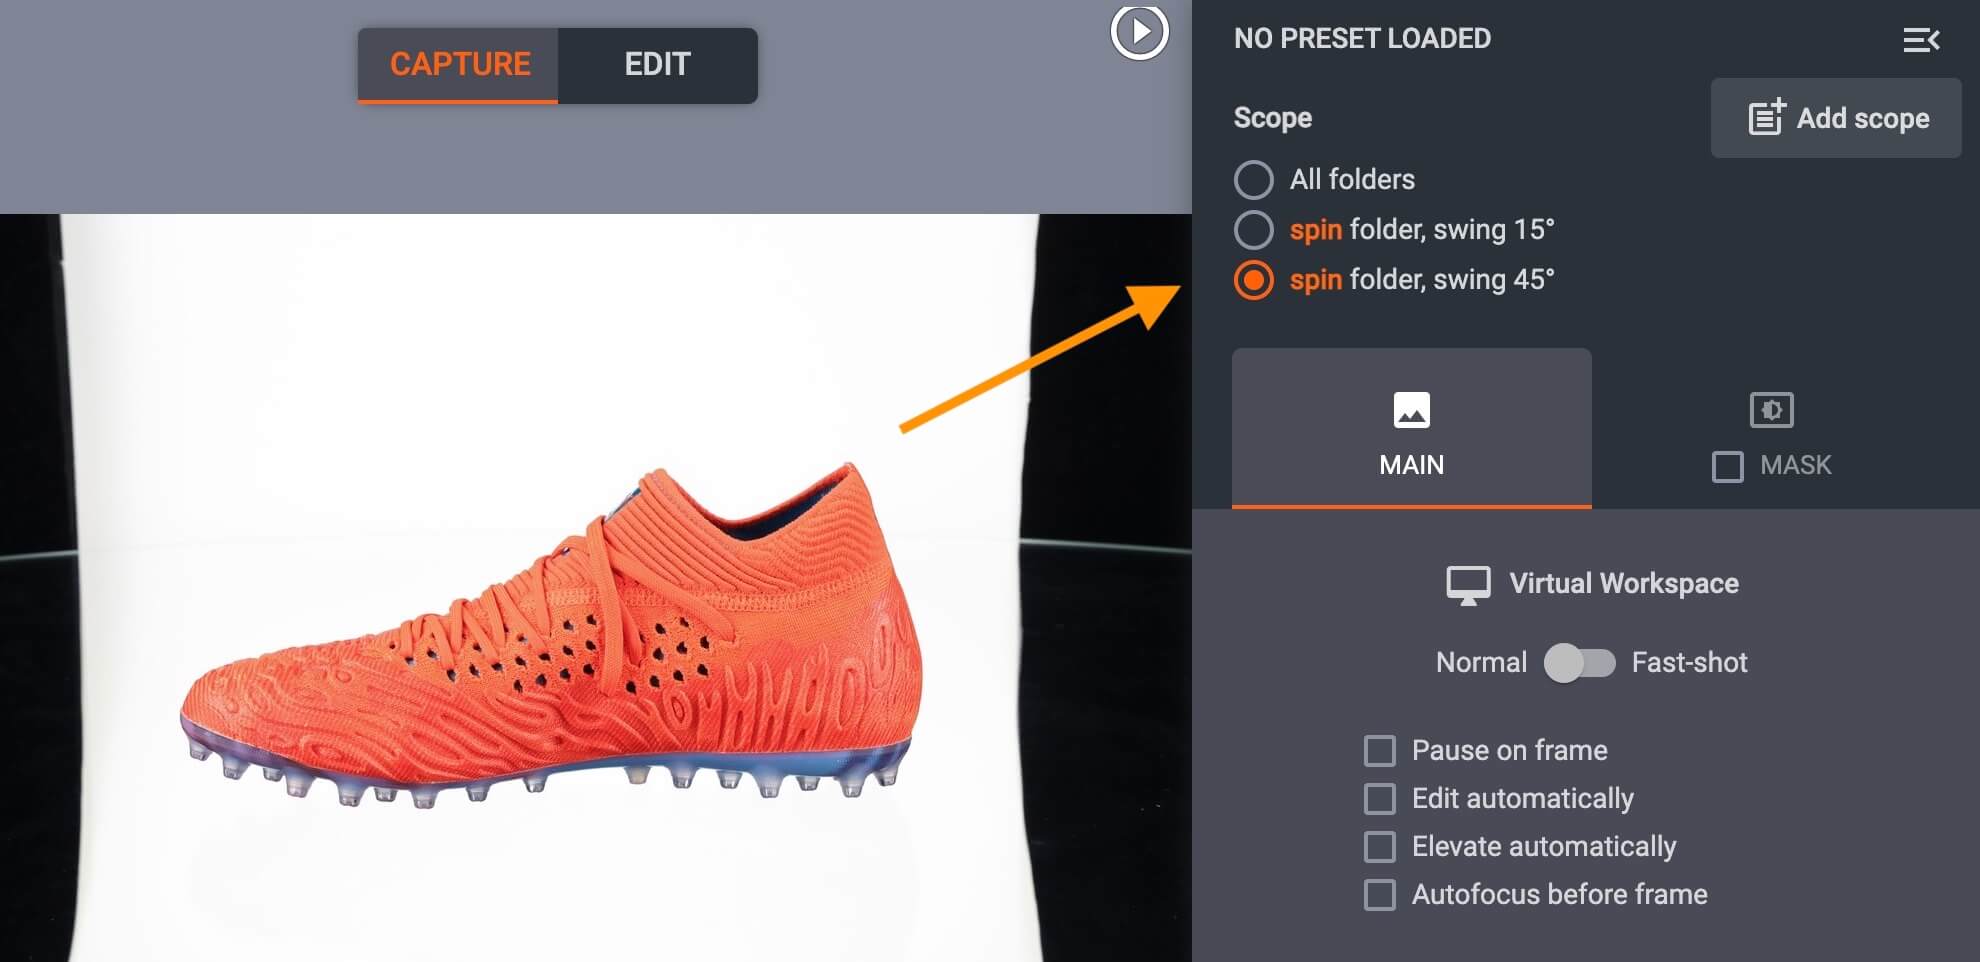
If applying different scope settings to multiple swing angles, click the specific swing angle to view or configure the settings assigned to its folder.

  • For example, it is possible to configure low intensity light for a spin folder at a swing angle of 15°, and high intensity light for a spin folder at a swing angle of 45°.
  • Users can also add settings scopes to a still image folder, or any other folder within the item.
  • The system will then apply settings scopes automatically when capturing images.

To view or configure the settings scopes across all images, click All folders. After configuring the settings scope, clicking the start button will begin the capture process with its assigned Presets.

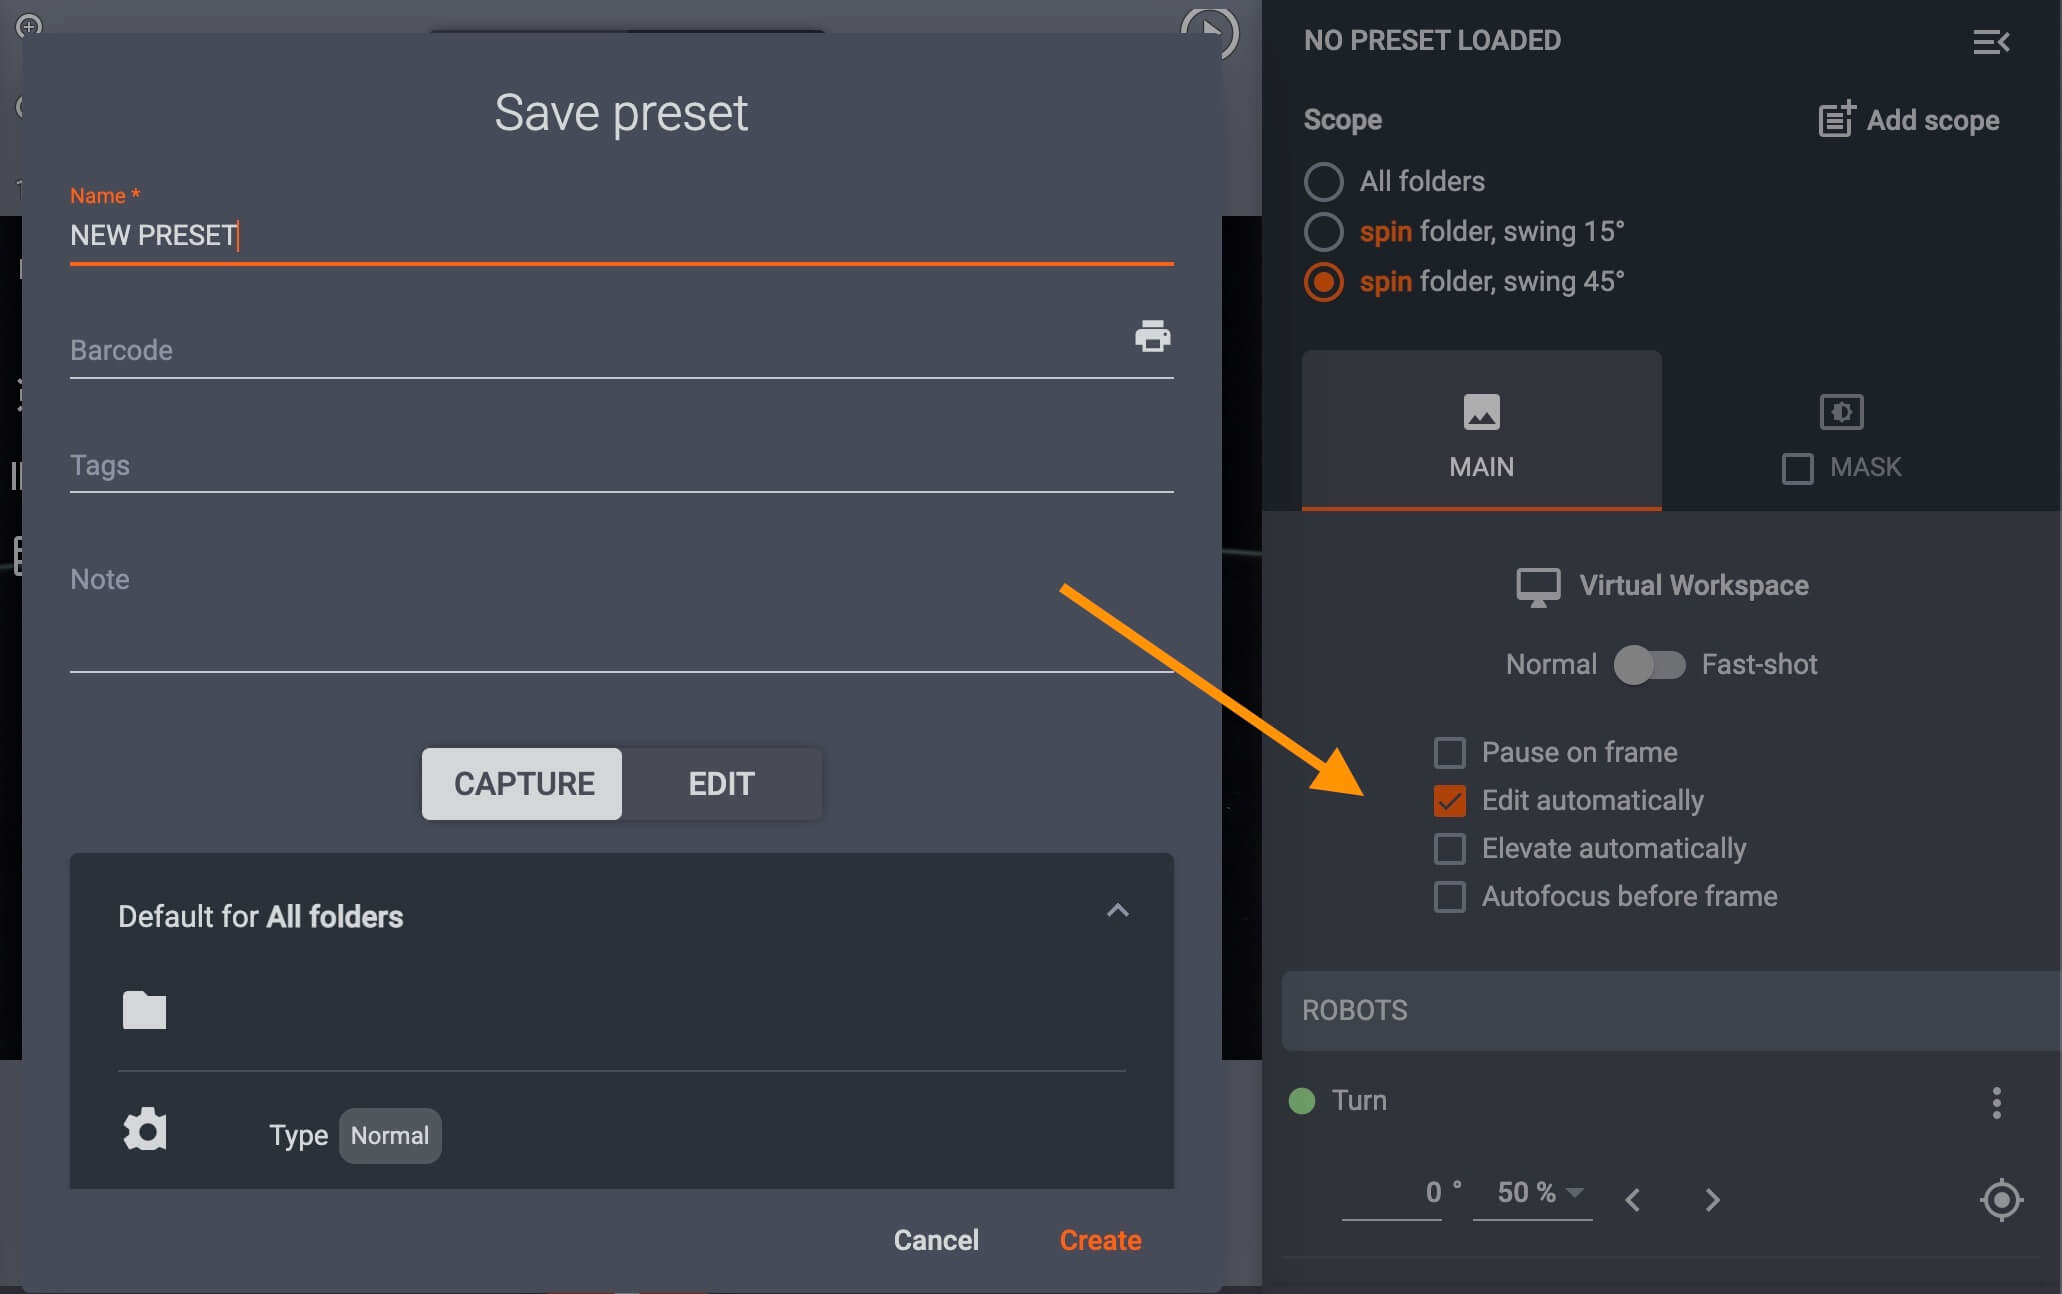
Further, if Edit automatically is configured, the system will capture photos and also apply predefined editing operations automatically after clicking the start button.

Enable PhotoRobot edit automatically

( ! ) - To find more information on all editing operations and their functionality, see the PhotoRobot User Support Manual - Editing Images.

Macros Functionality

Macros in CAPP enable users to define commands for the capture process of an item and its folders (spin, stills, etc). Commands can apply to individual or multiple folders, run sequences, image edits, workspaces, presets, copy image settings, and move image settings. Users can also further customize macros by name, barcode, tag, or notes.

To view a Macro or customize its basic settings (name, barcode, tag, notes), open Settings in CAPP, and click Macros in the side-bar menu options:

PhotoRobot macros
  • Use Advanced search at the top of the list of macros to find a macro by name, or select macros individually by clicking a macro name in the list.

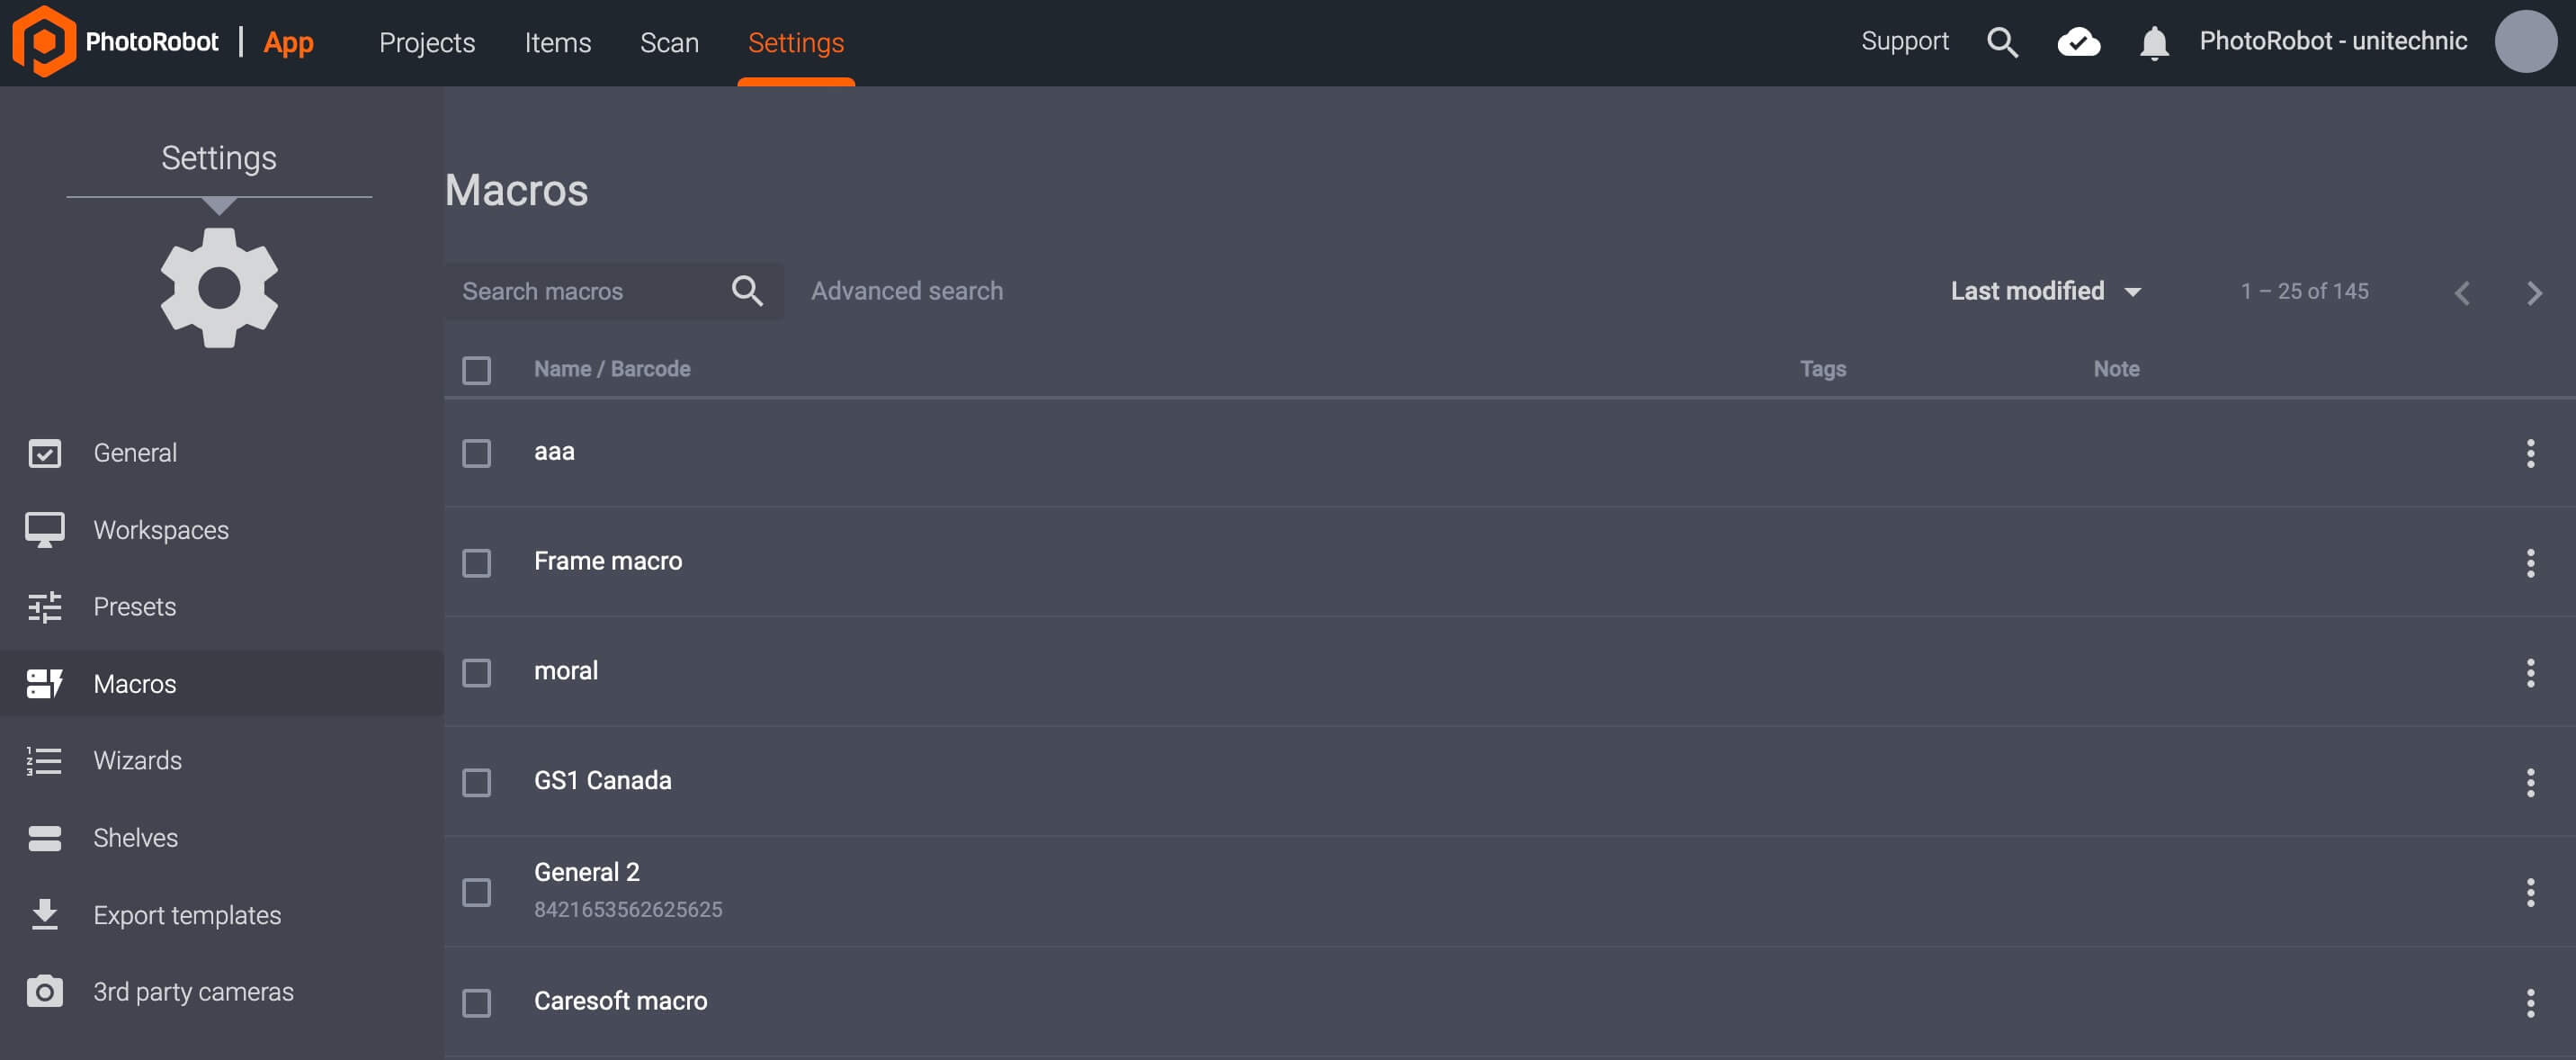
Note: Selecting a macro displays the macro with its commands in read-only. However, users can configure macro name, barcode, tag, or notes here:

View PhotoRobot macros

  • If customizing any fields, click Save in the bottom-right part of the Macro dialogue to confirm user settings.

Create new macro

To create a new macro, create a new item or open any existing item in the local version of CAPP.

Create new capture macros

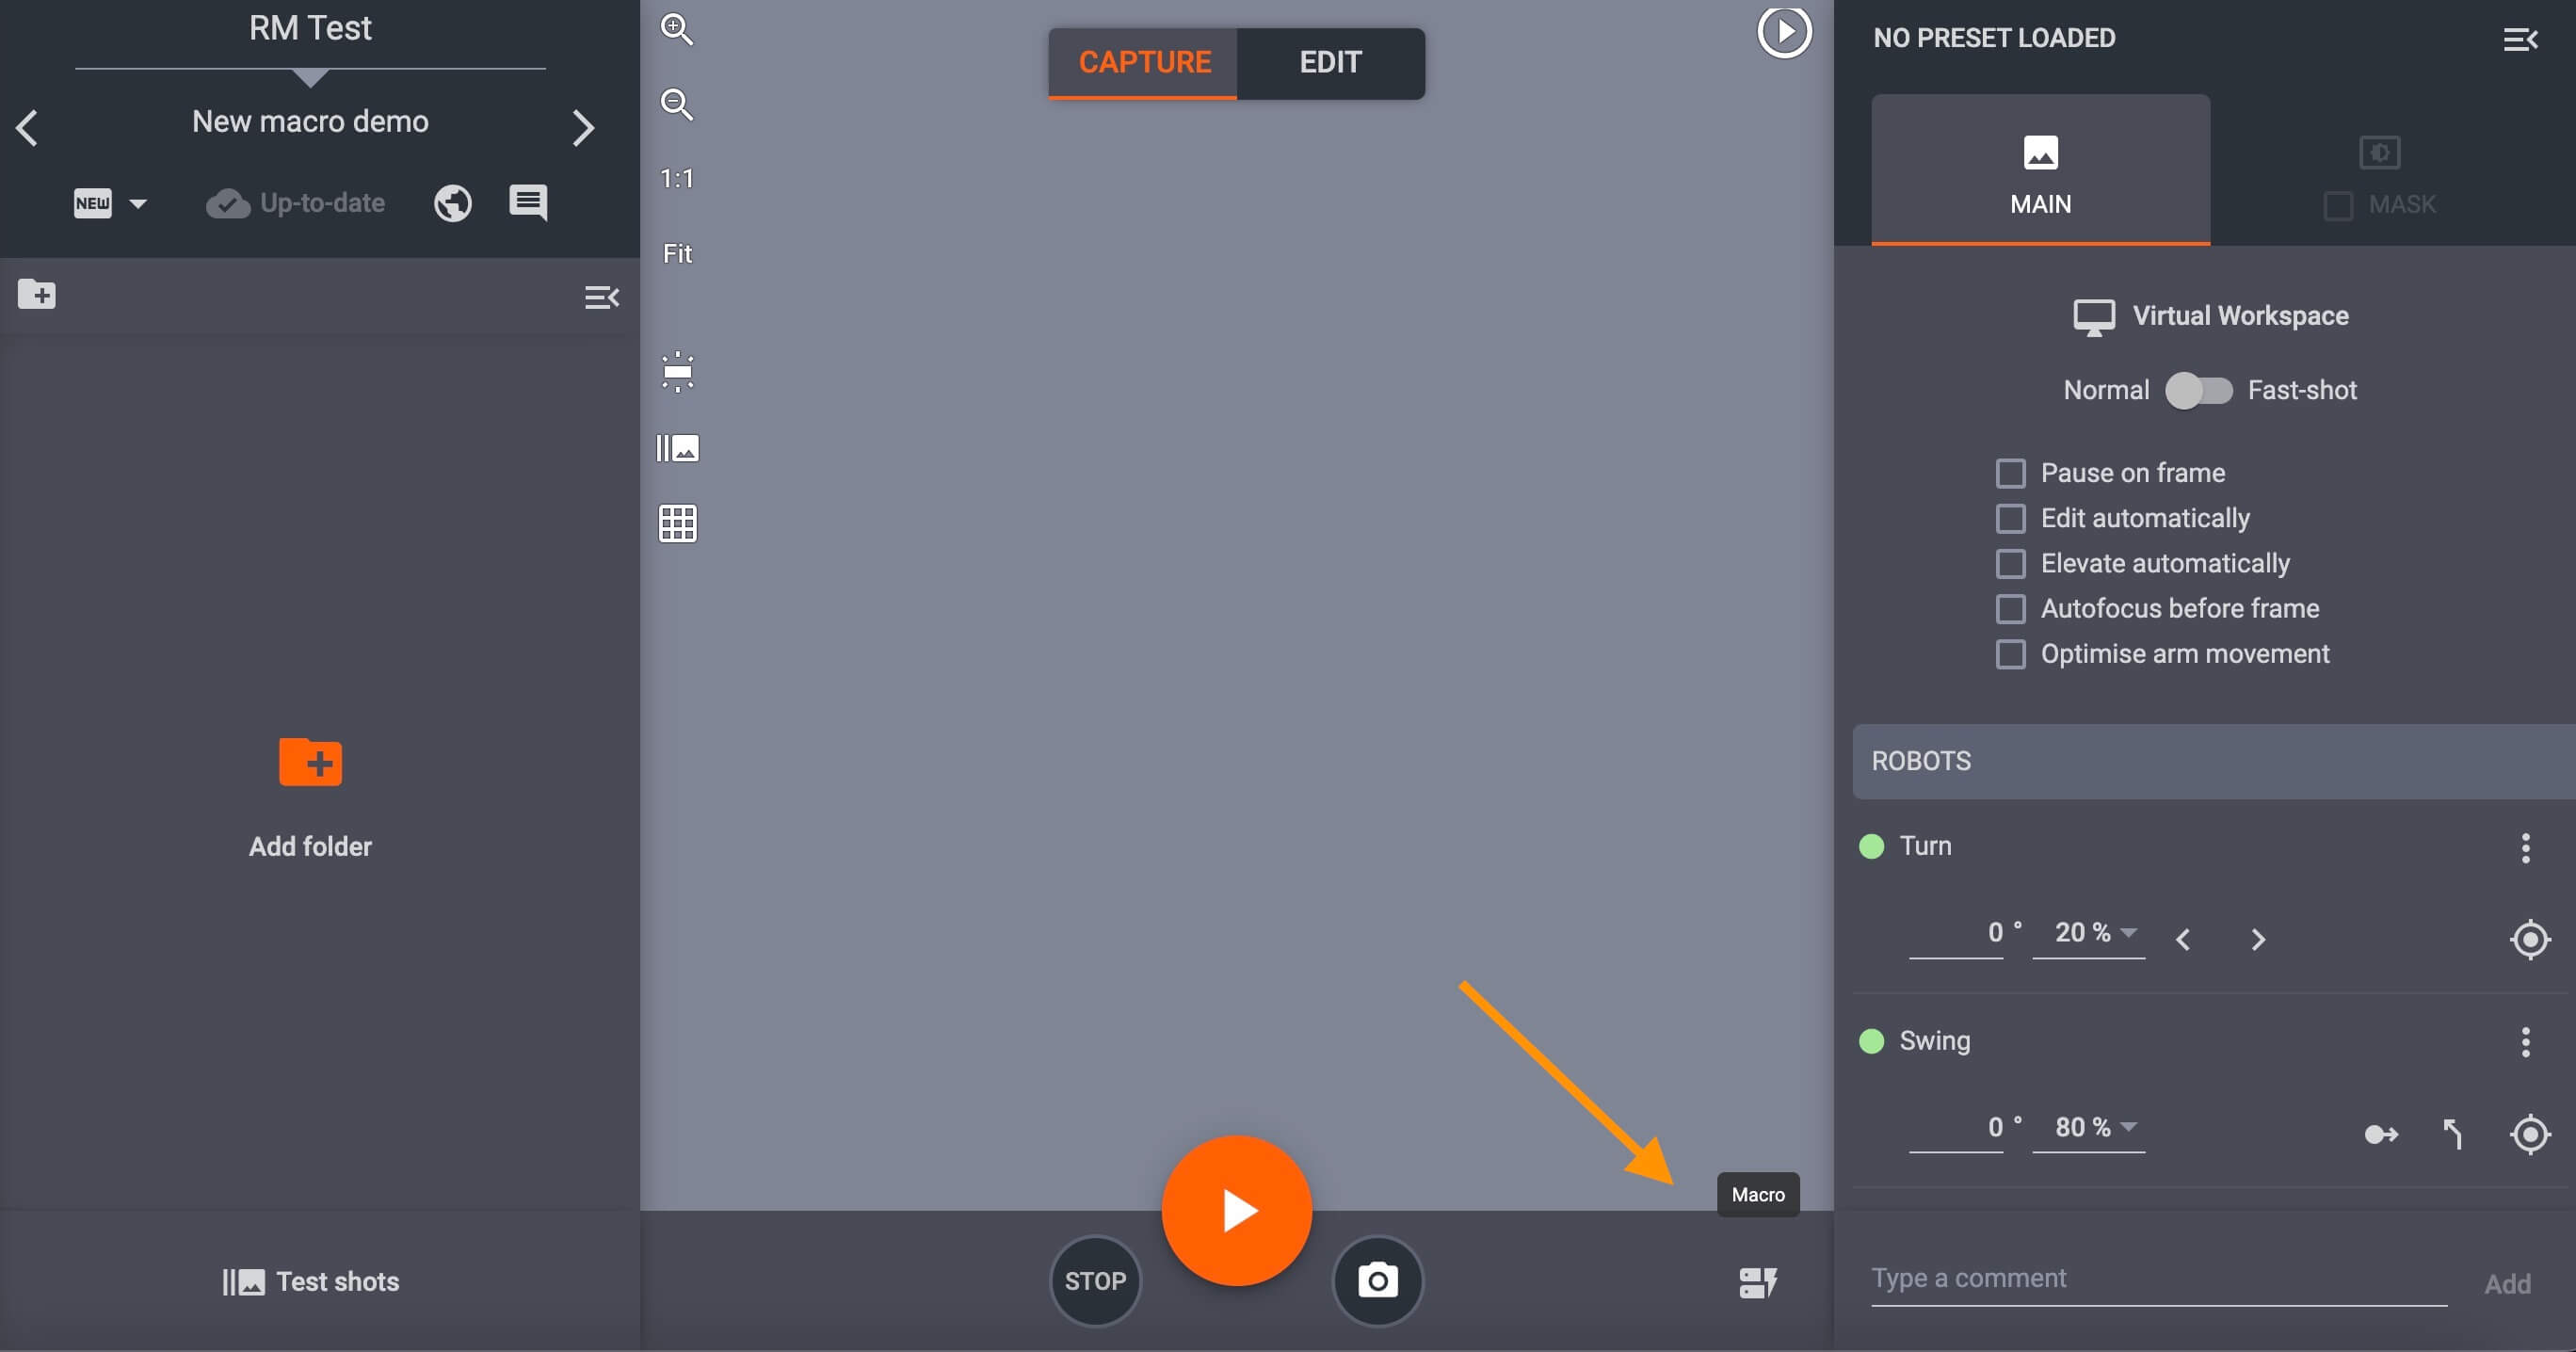
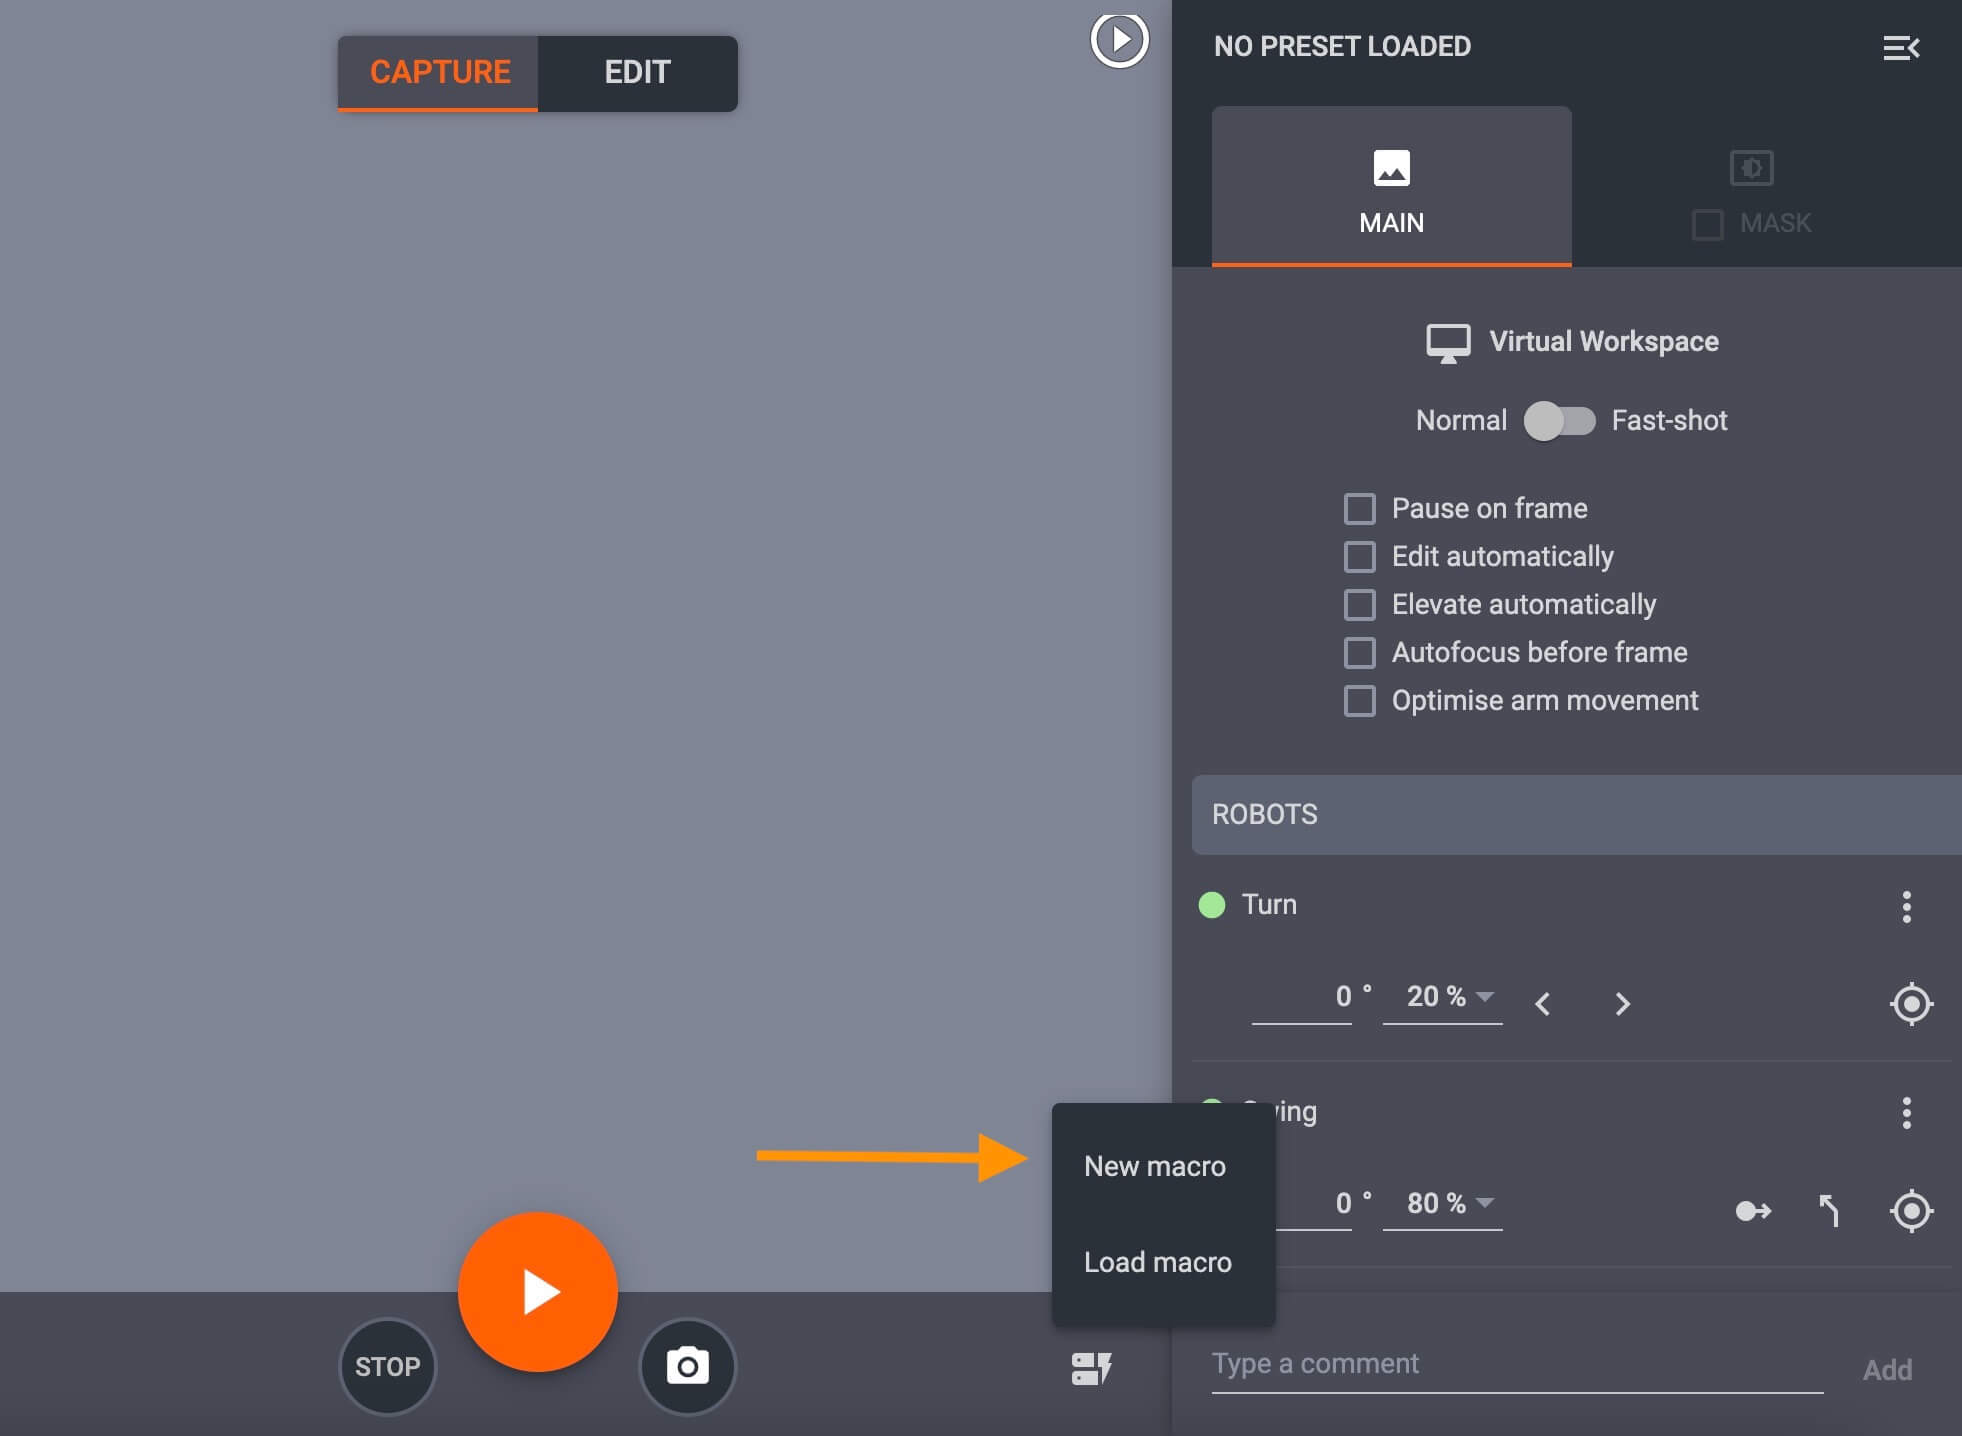
Within the item, the button to access Macros is in the bottom-right part of the capture mode interface.

Access macro settings by clicking the Macros button and New macro:

PhotoRobot open macros
Create new PhotoRobot macro

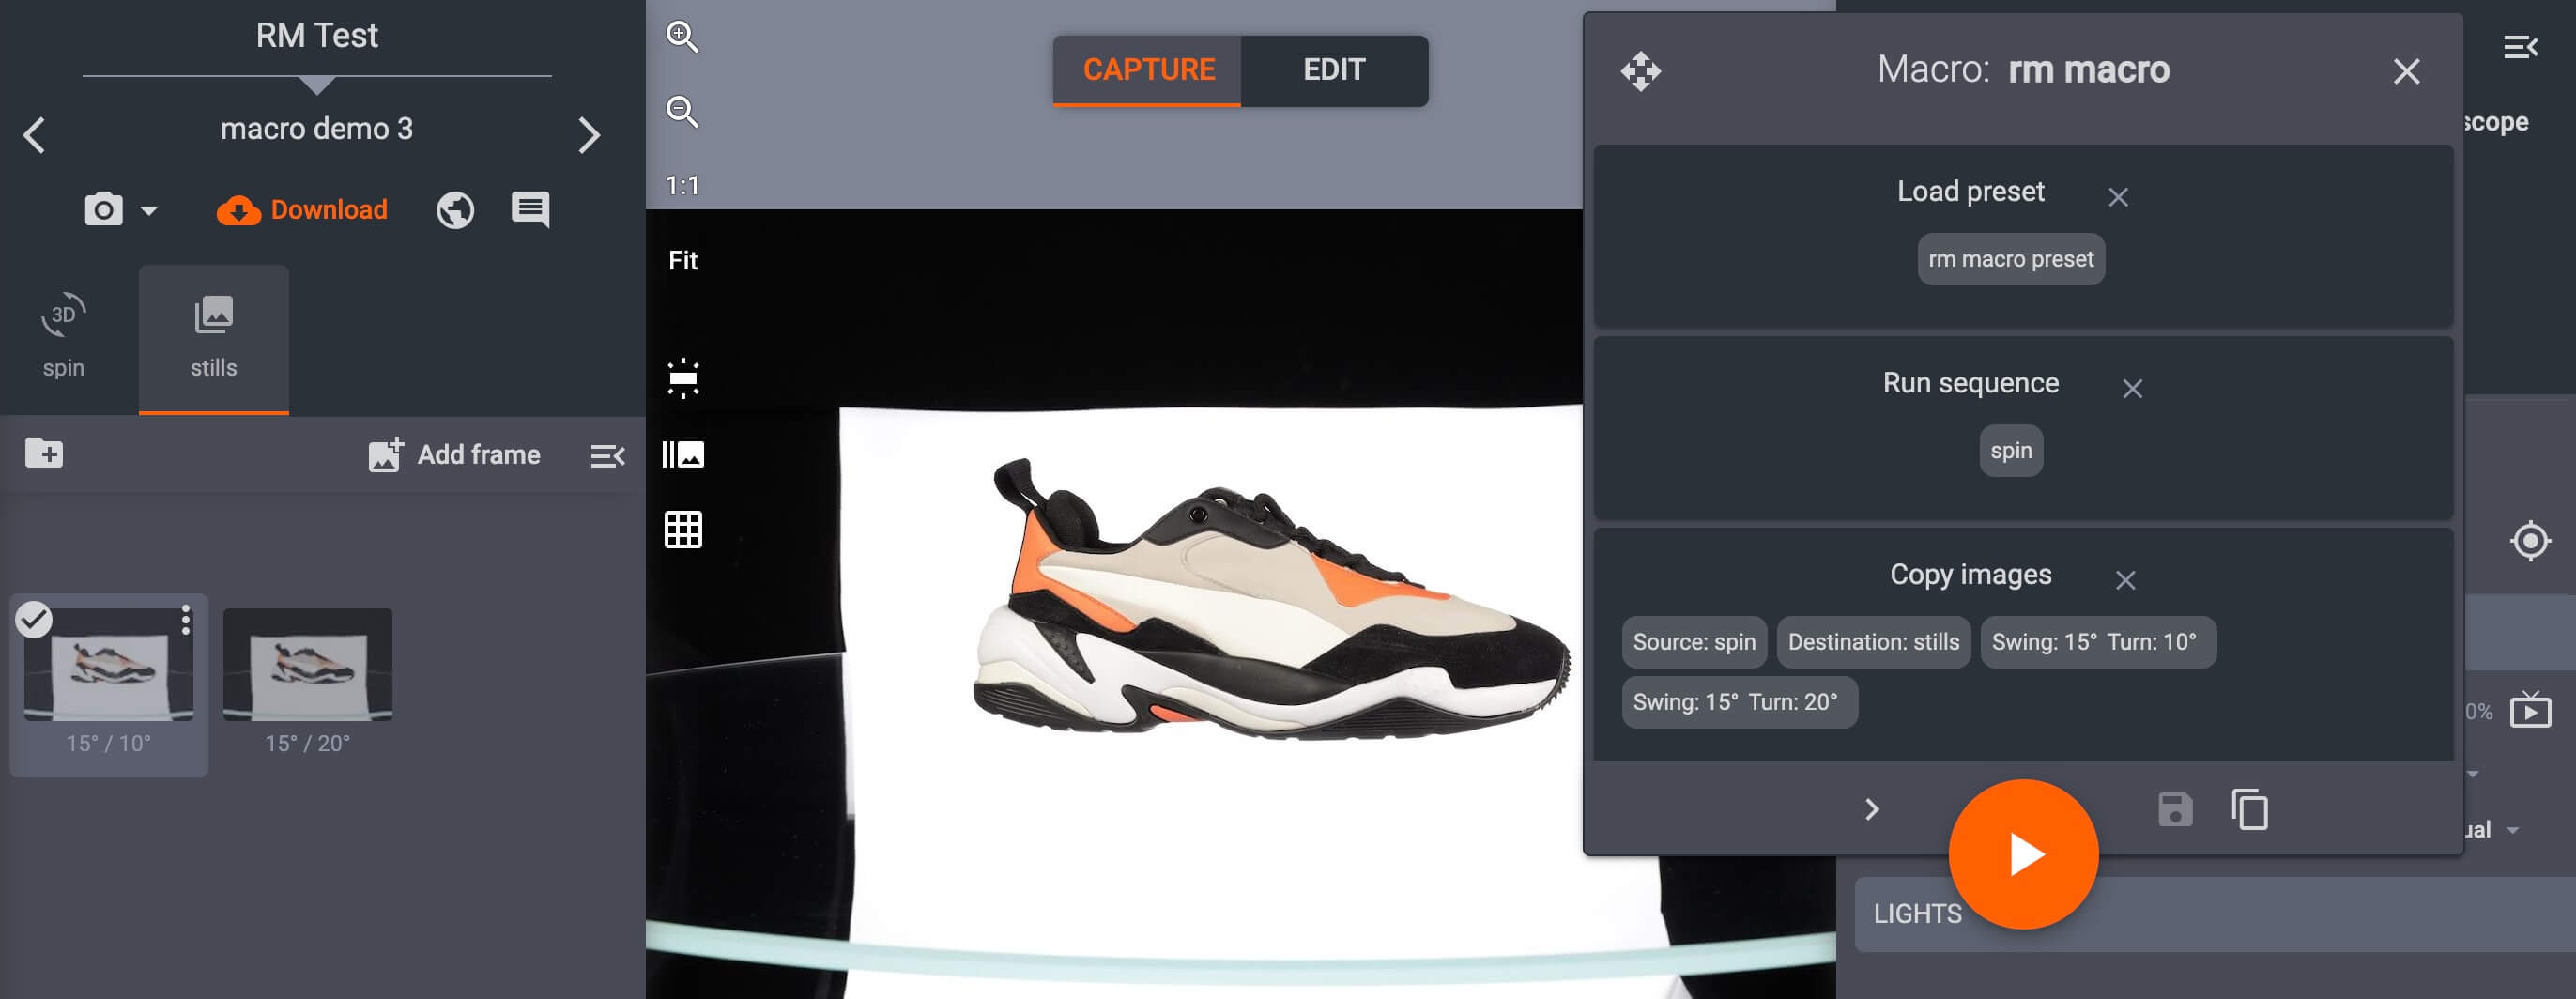
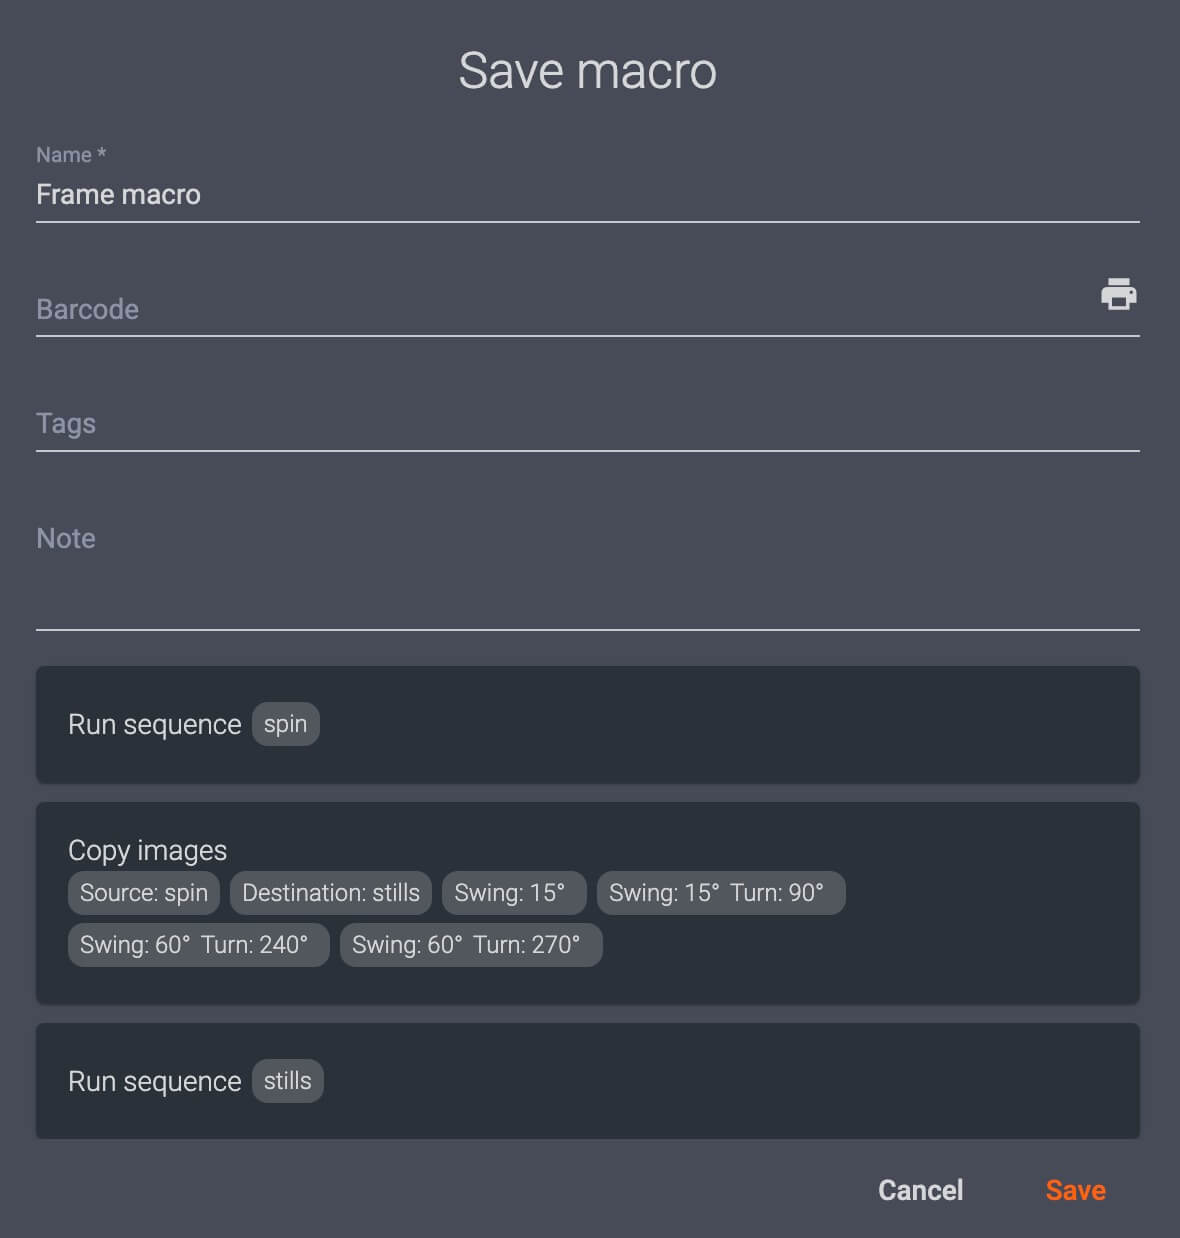
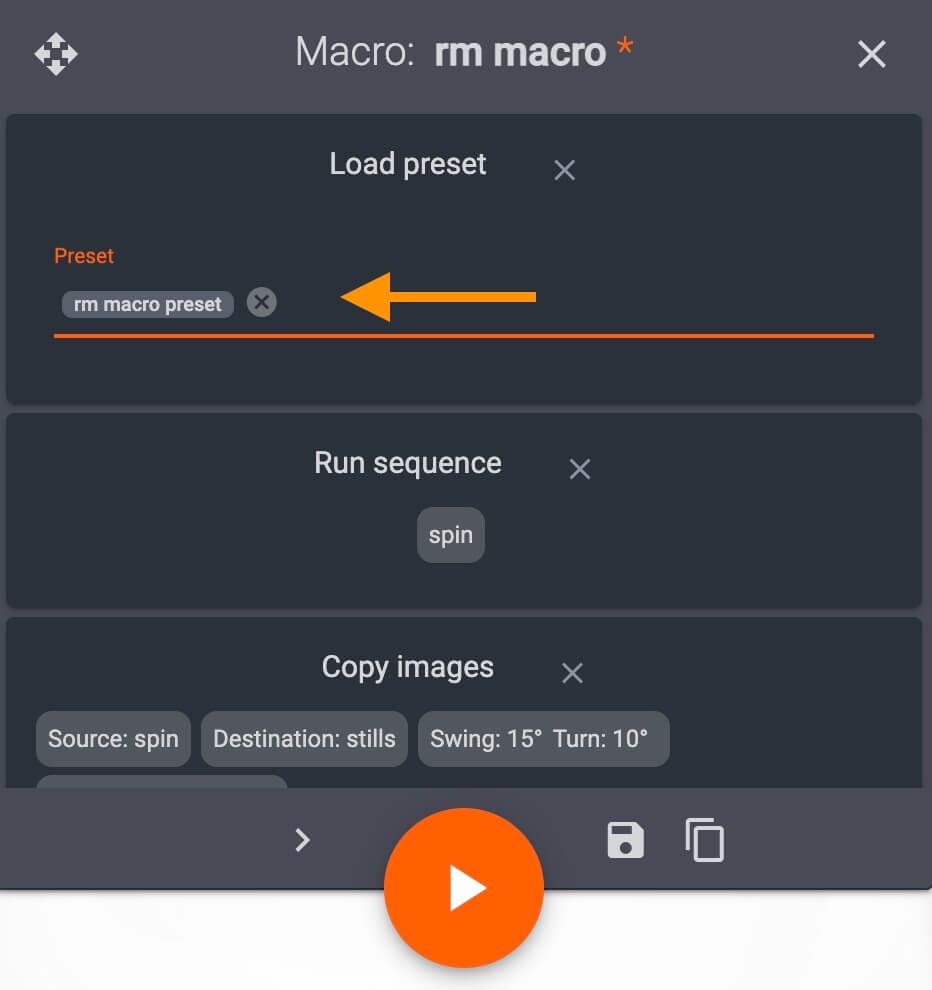
When creating a new macro, a pop-up box will open to define the macro by name and commands:

New PhotoRobot macro command box

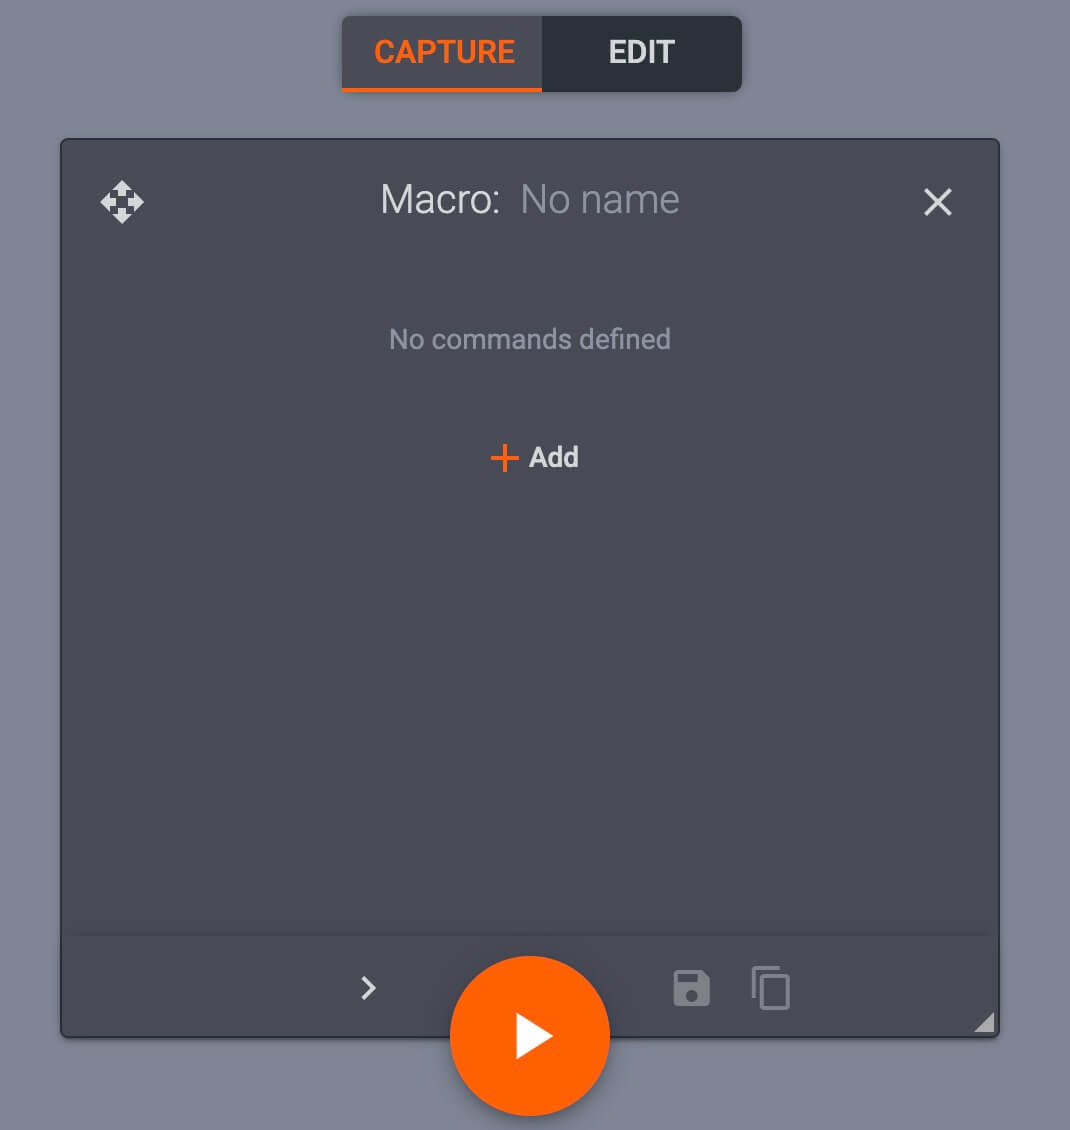
Click the field at the top of the macro dialog to set its name, and use + Add to configure macro commands:

PhotoRobot macro commands list

  • Configure Change folder to run commands on an existing folder, for example on a spin or stills folder.

Software macro change folder

  • Set Run sequence to run a sequence, for example: only on a spin folder, or to specify which folder the sequence should run in (stills only, spin only, etc):

Software macro run sequence

  • Use Copy images to specify source and destination folders of specific swing or turn angles to copy:

Software macro copy images

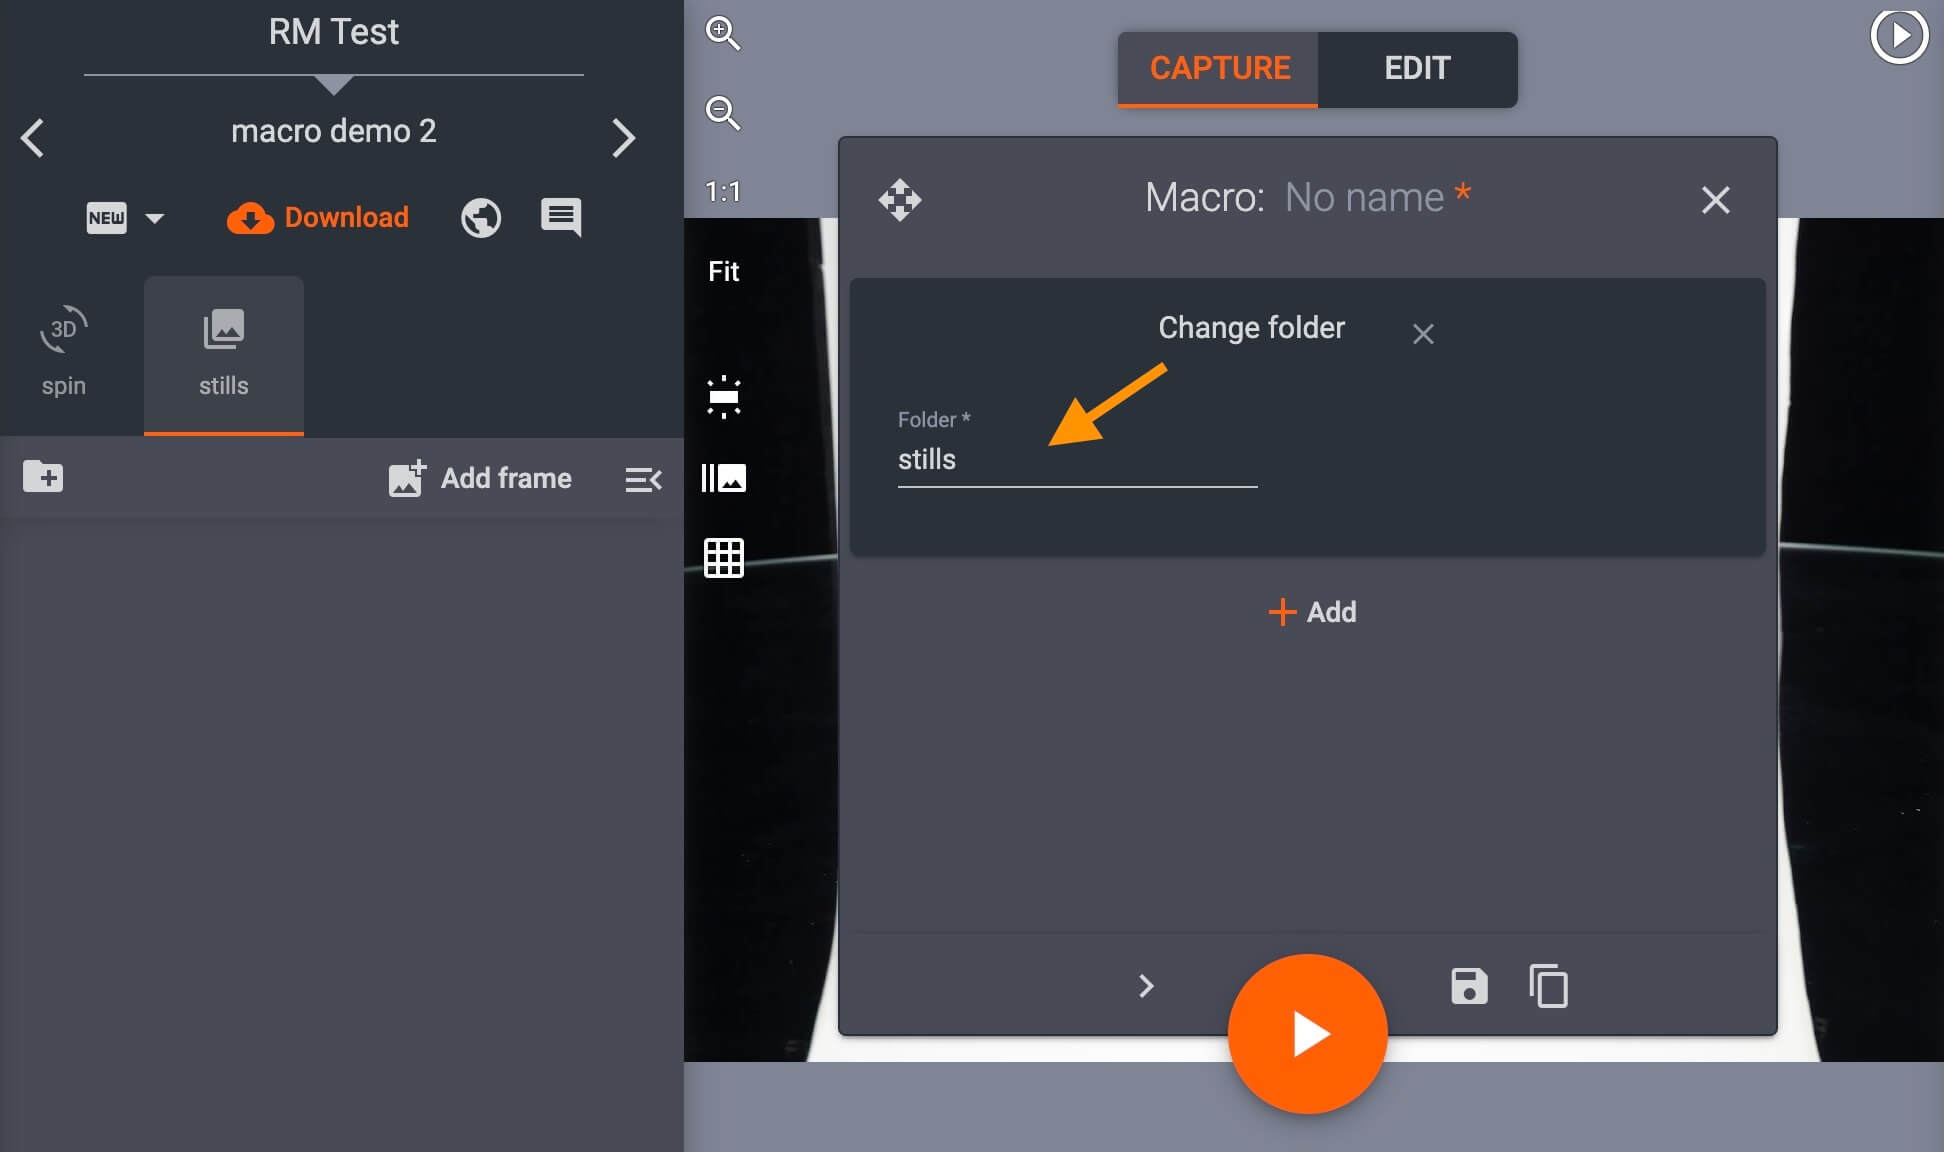
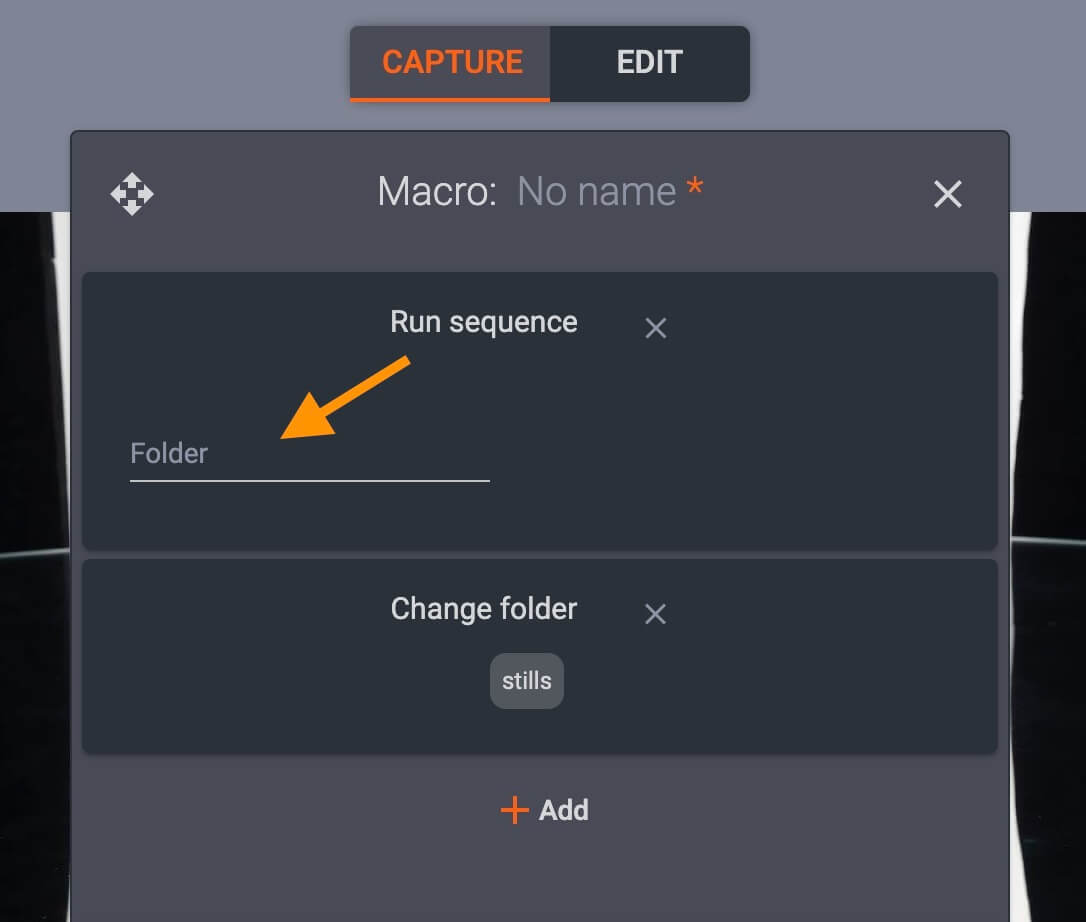
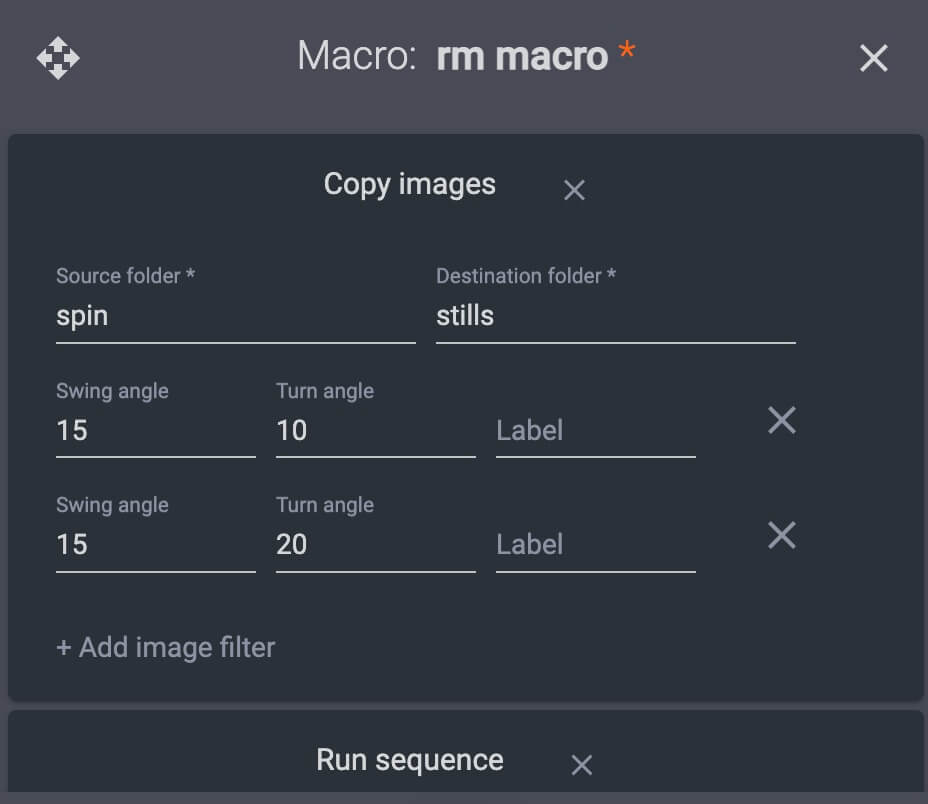
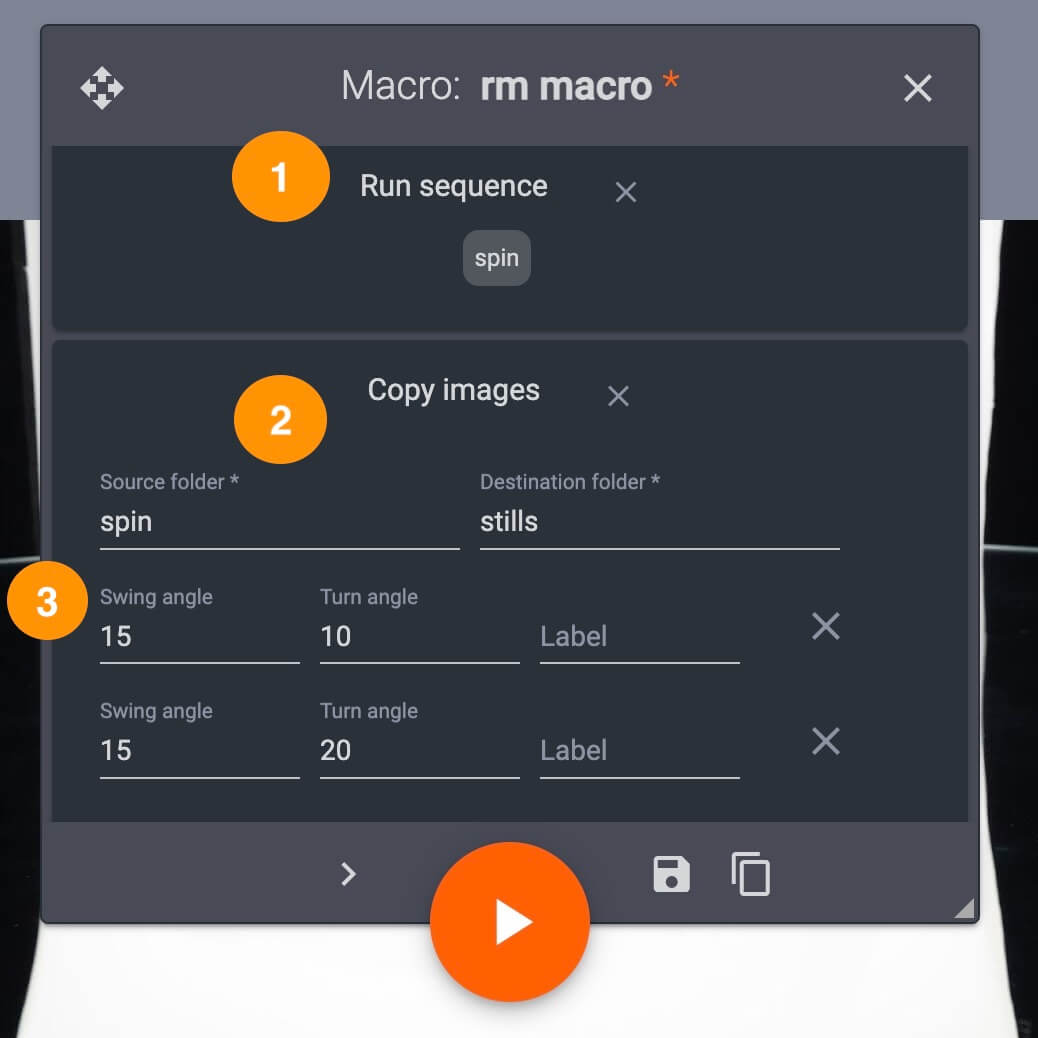
For example, a macro can instruct the system to capture a 360 spin, and copy two frames from the spin folder into a separate stills folder.

In this case, macro commands would be Run sequence (1) on the spin folder, Copy images (2) from the spin folder to a stills folder, and Copy specific swing and turn angles (3) into the stills folder:

PhotoRobot macro config example

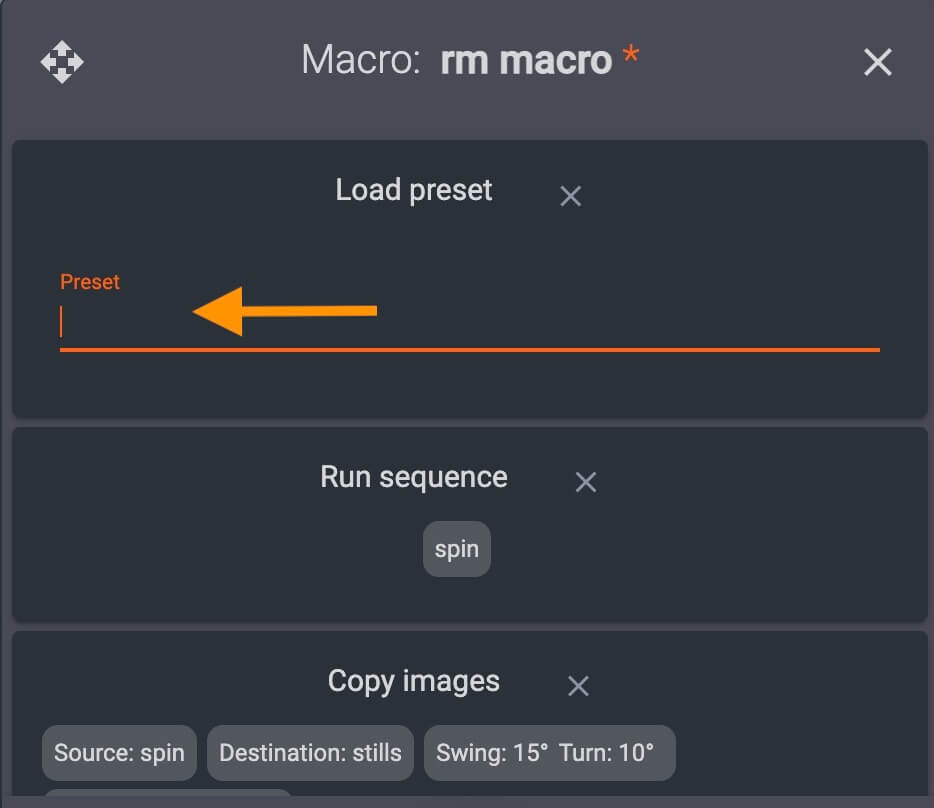
Often, a macro will also include one or more Presets.

  • Load preset will assign individual or multiple Presets to the new macro. 
  • Select Presets by clicking on the empty Preset field:

Load macro preset
Preset selection macros
Confirm loaded macro preset

After assigning all commands, save the new macro by clicking the file icon in the bottom-right part of the macro settings box:

Save PhotoRobot macro

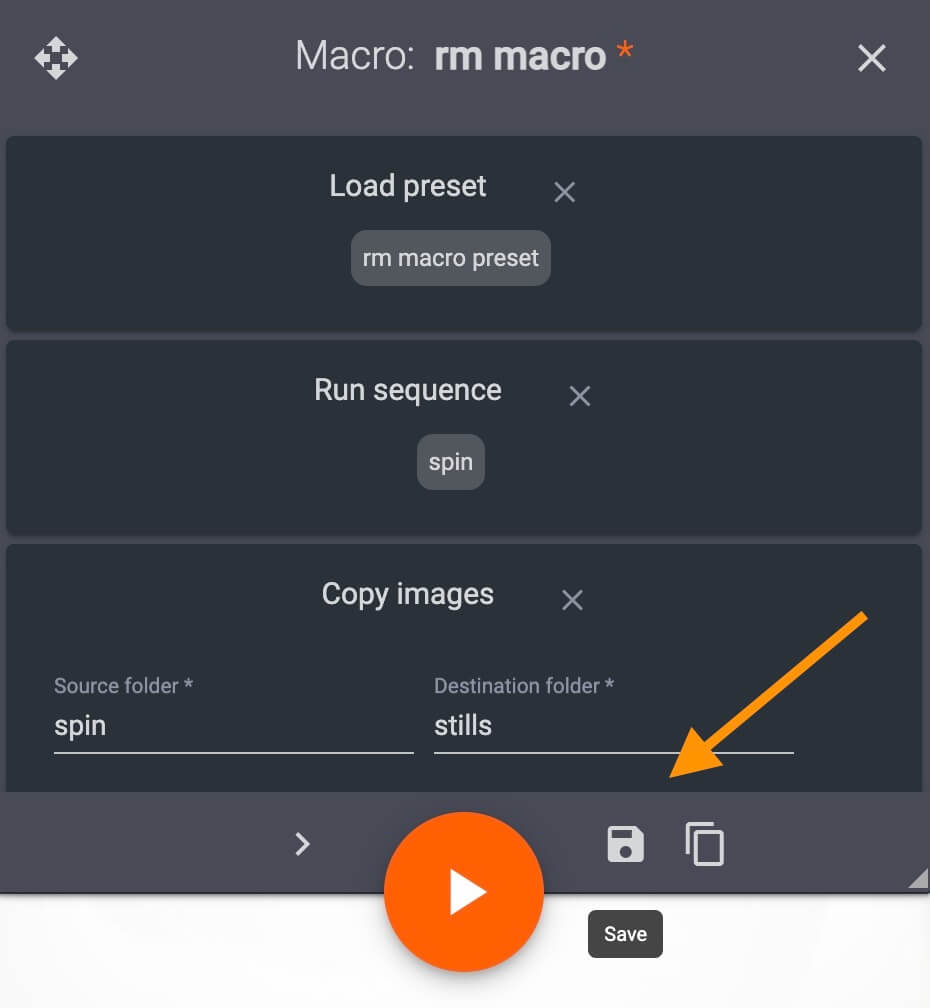
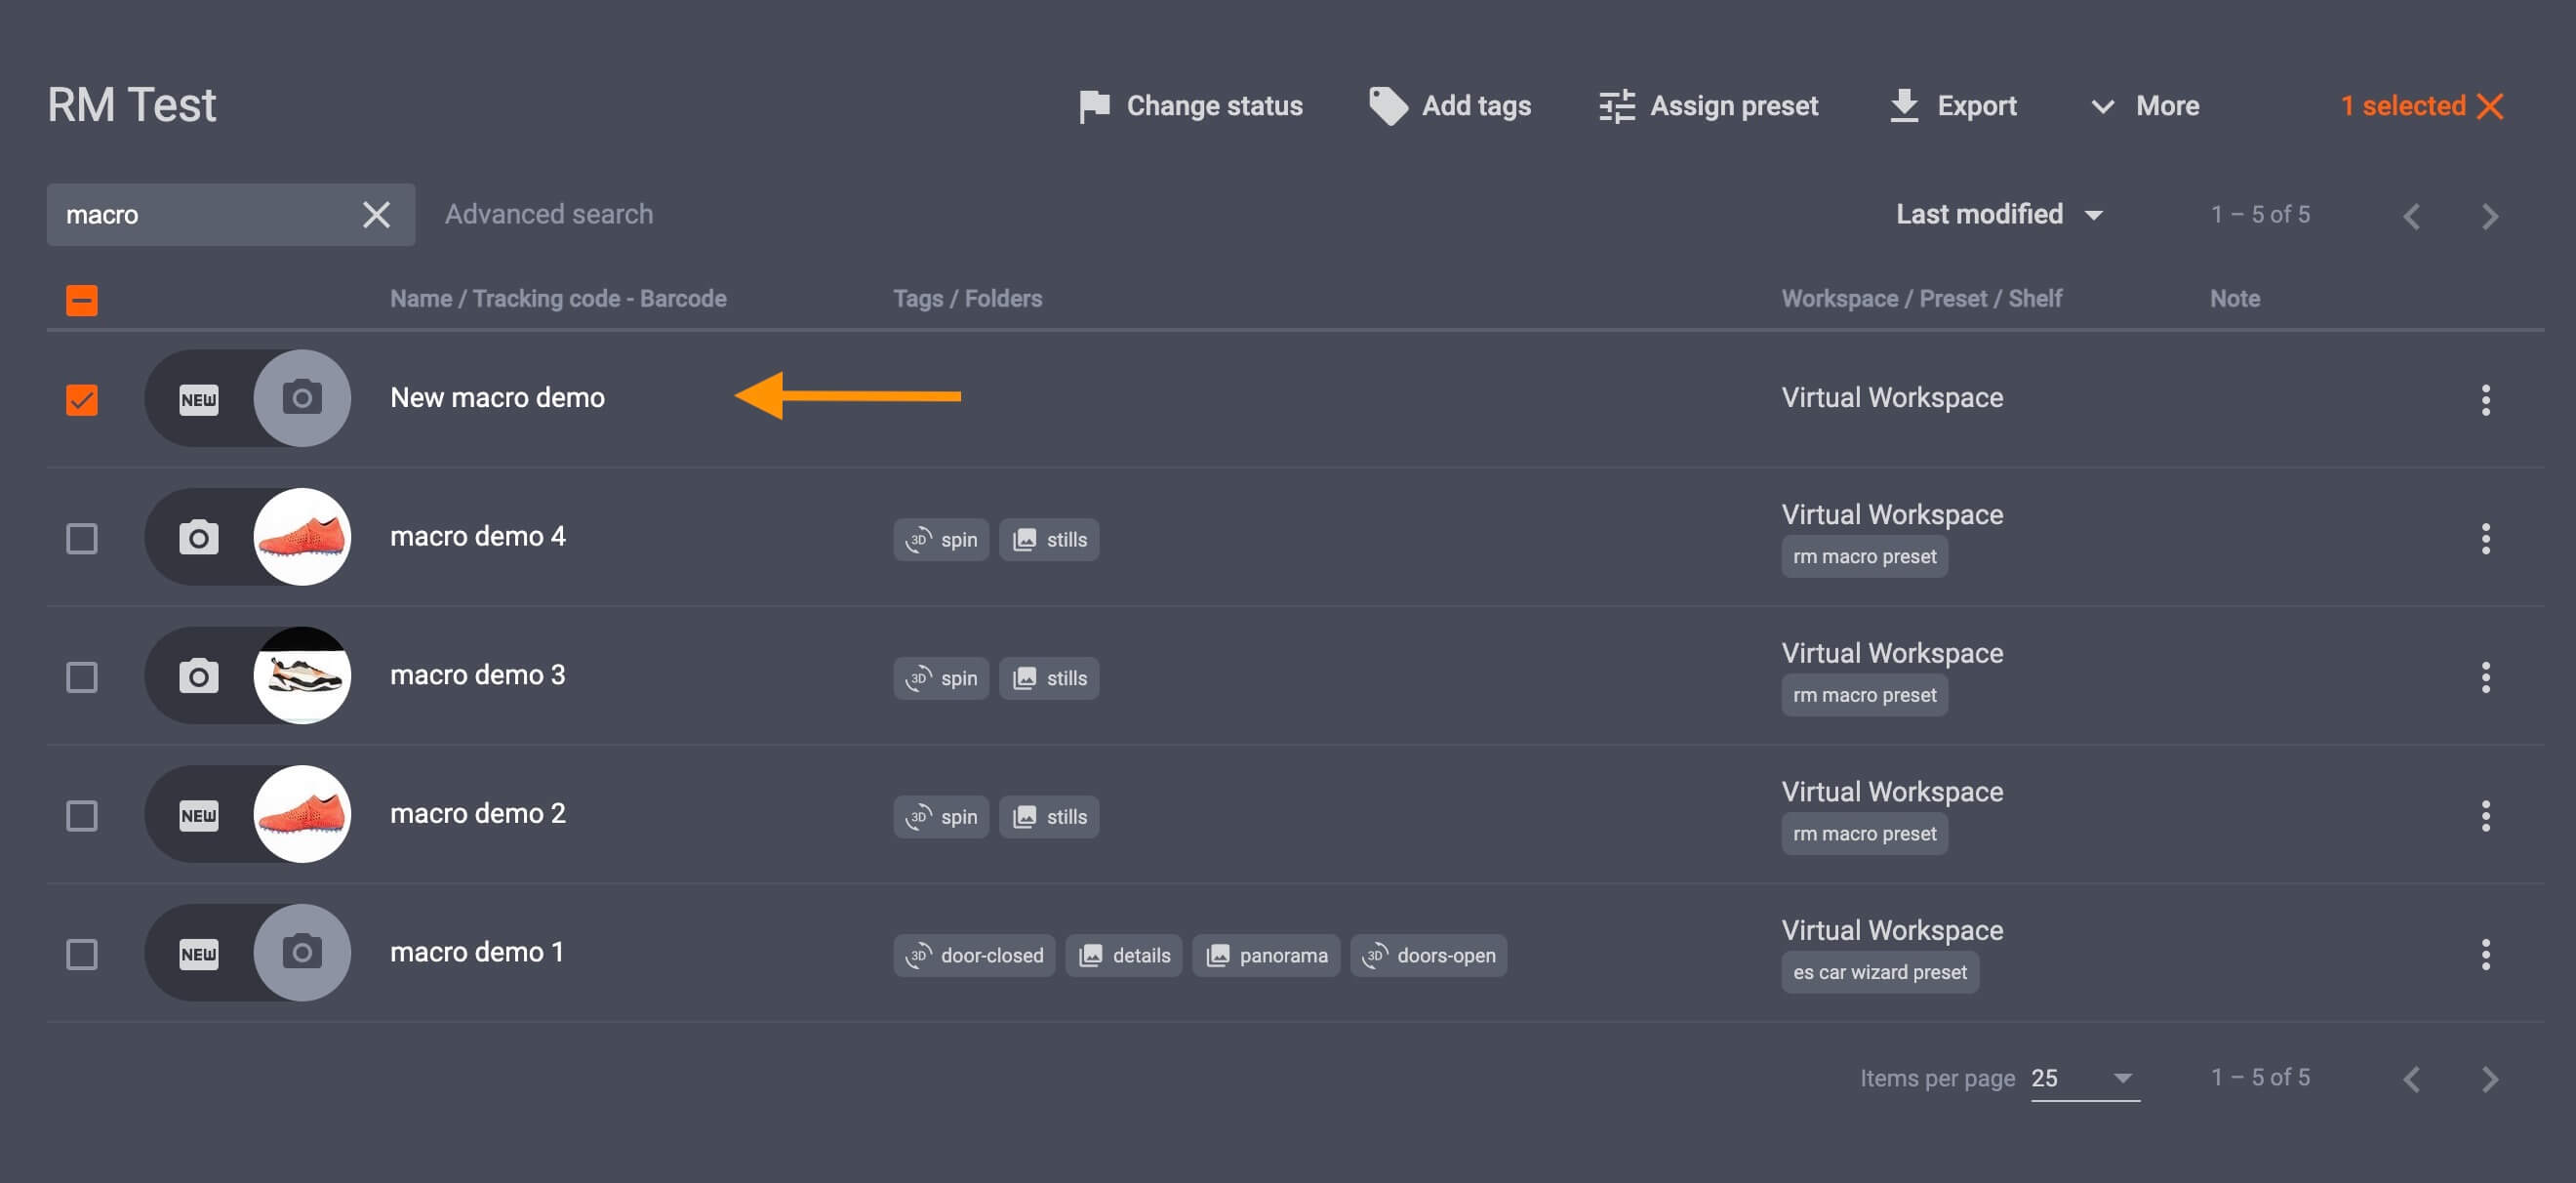
The macro is now stored in the system, and it can be loaded for any item in one of two ways.

Load existing macro

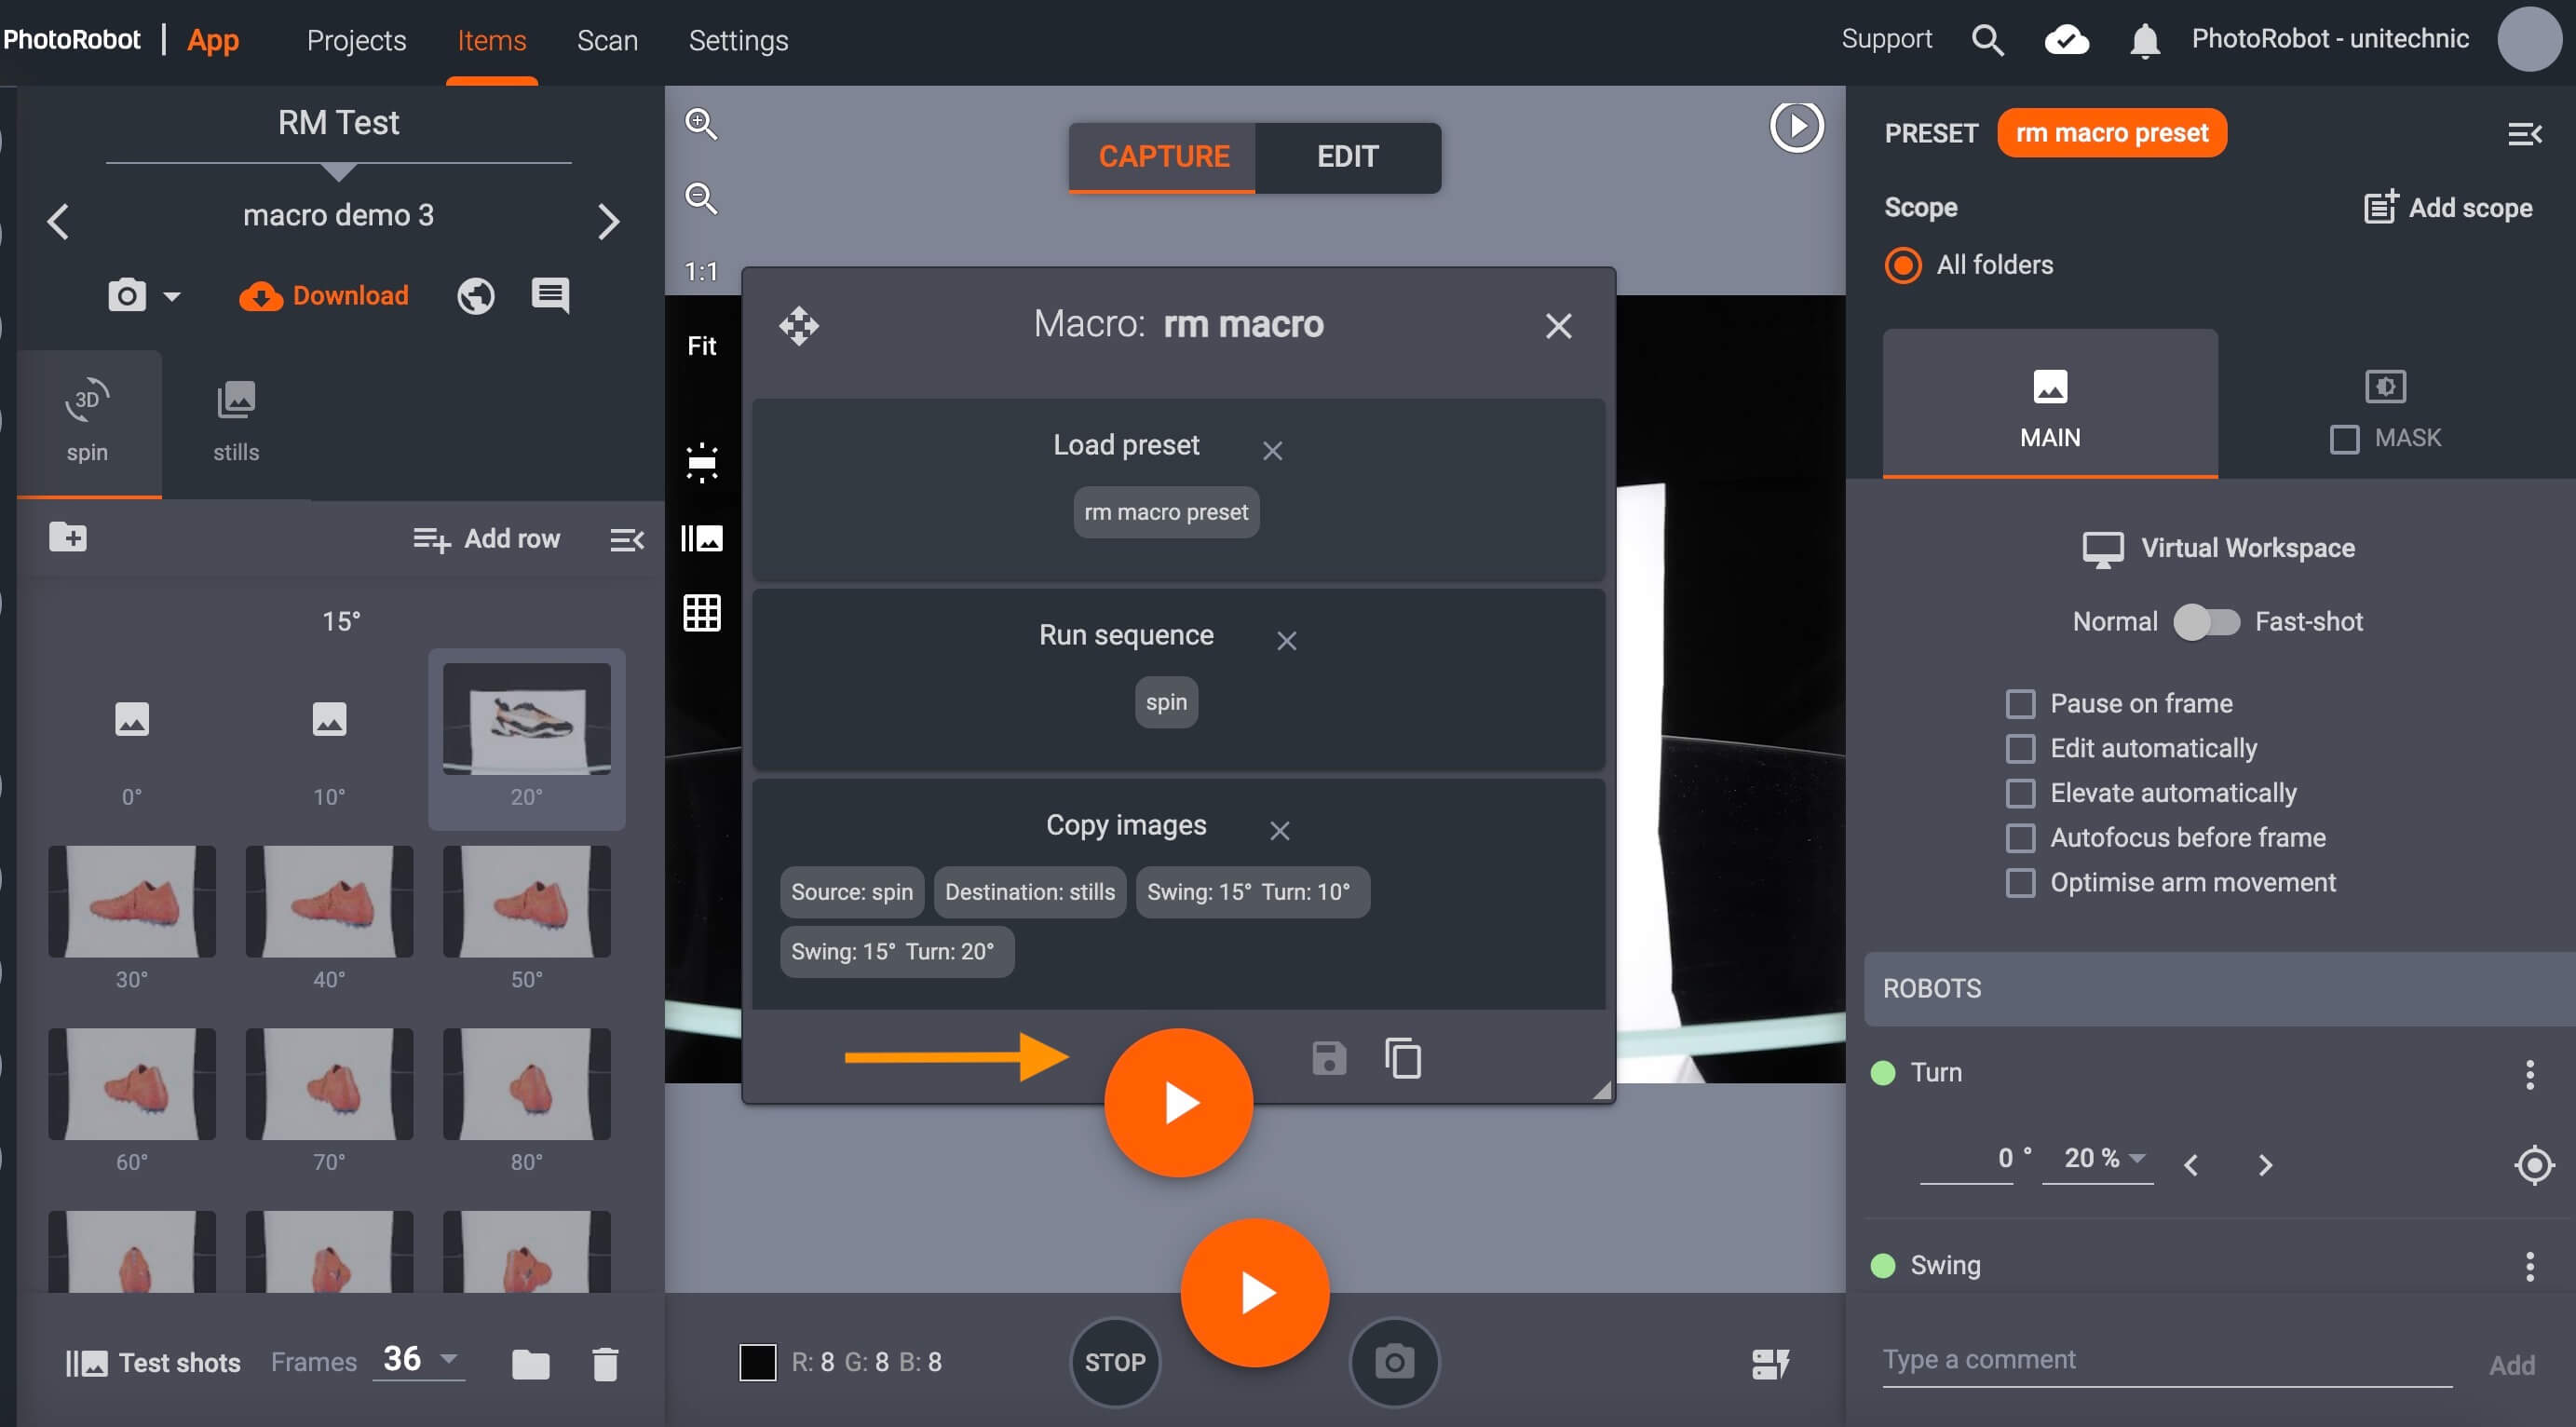
To load the new macro, open any item in CAPP, and use the button for Macros at the bottom-right part of the capture mode interface:

Run previous software macro

  • The name of the previous macro in use will display to the left of the Macros button. Click the start button next to the macro’s name to load this macro. 
  • If loading a different macro, use the Macros button on the right to select from all macros in the system:

Load existing PhotoRobot macro

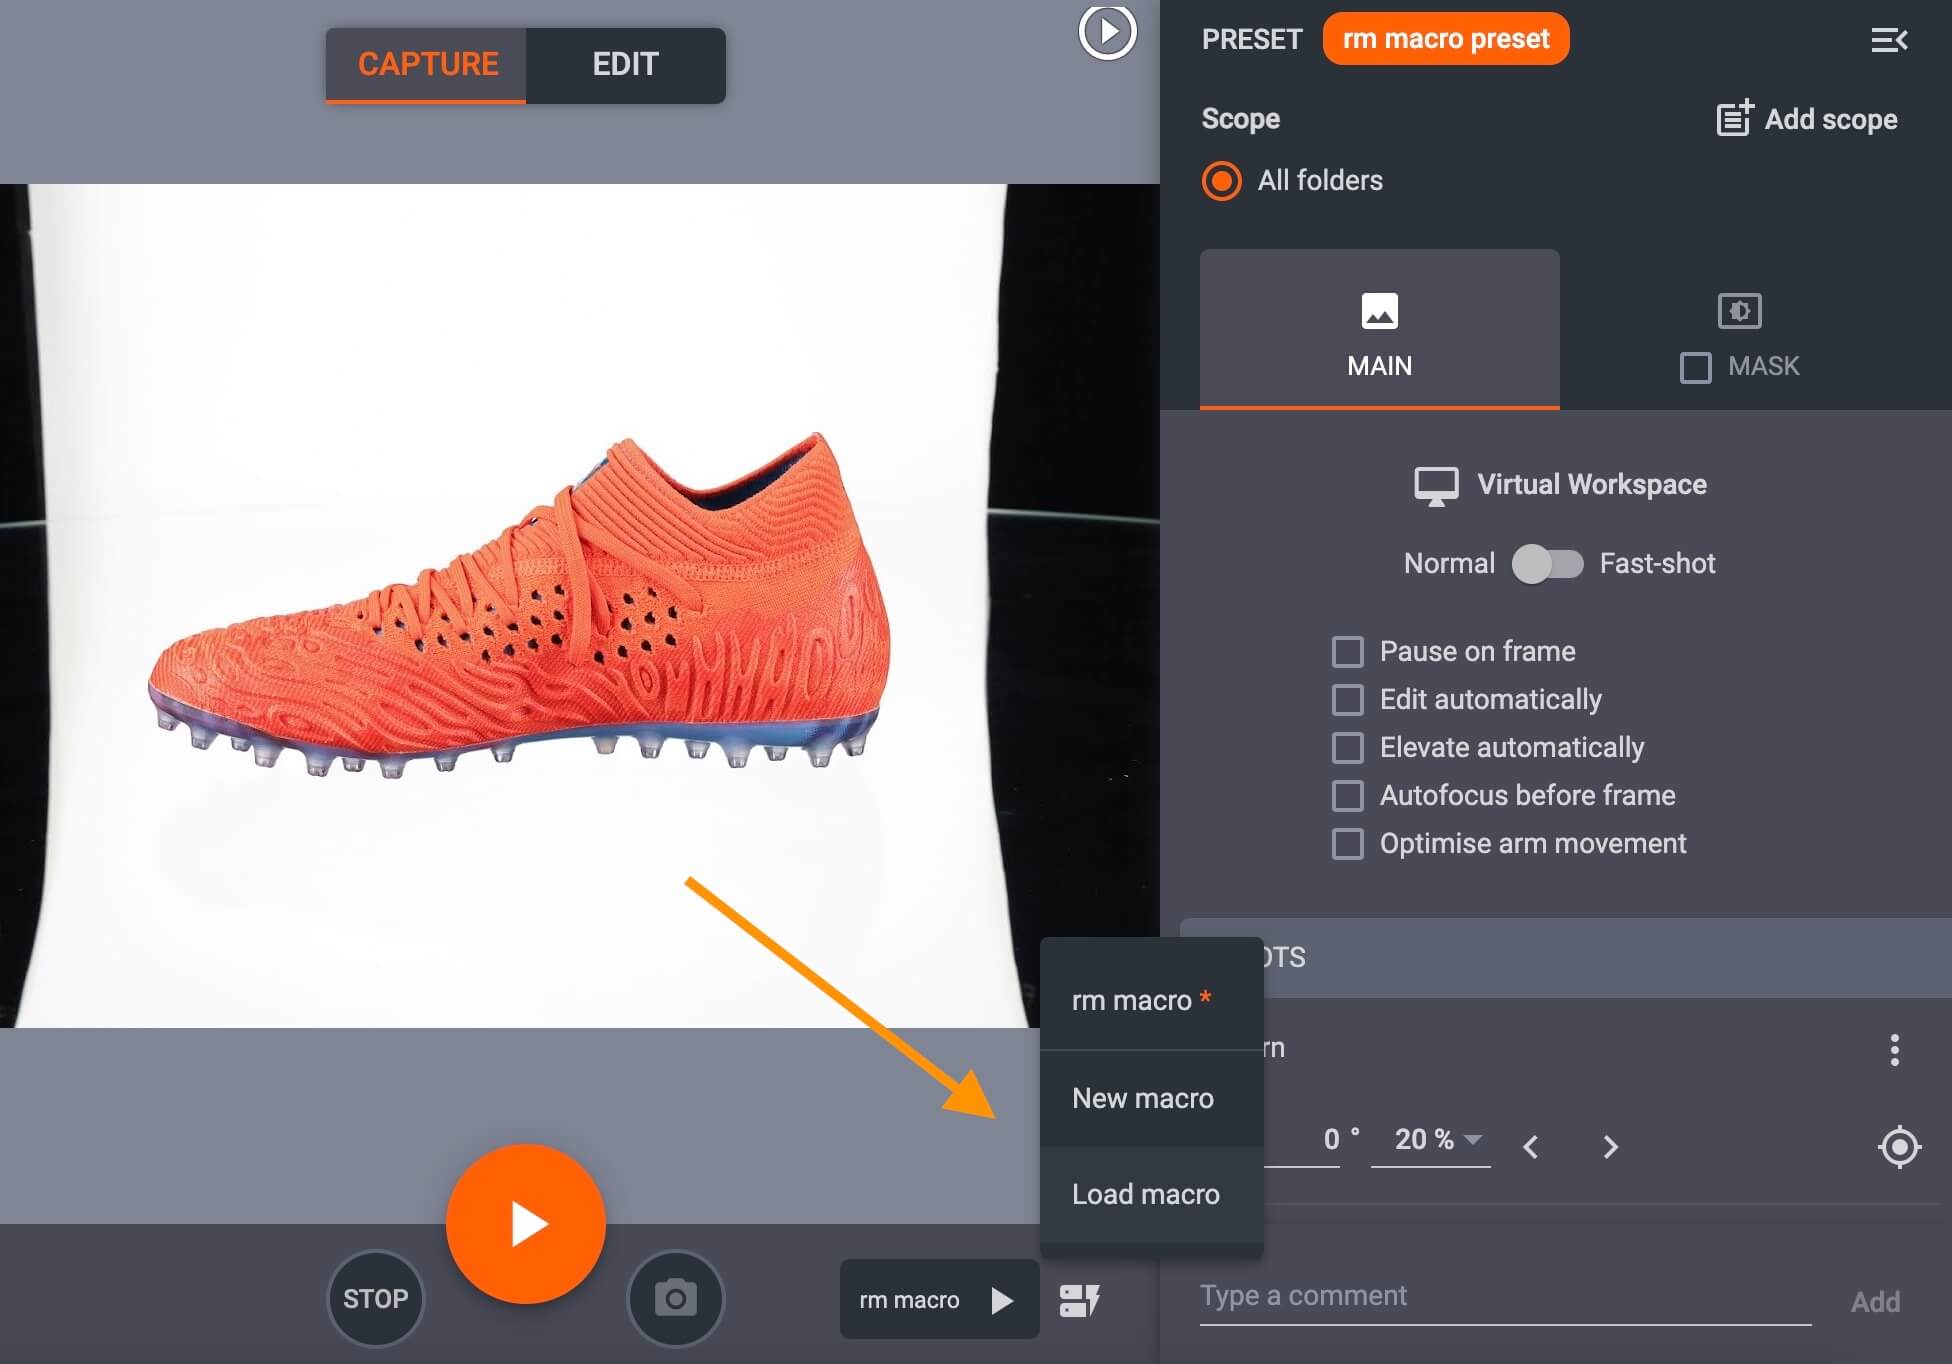
After selecting a macro, the Play button will run the capture process with all macro commands and presets assigned to it.

Run macro commands

If reshooting individual images and running the macro again, first select the frames to reshoot, and then click the button for the previous macro, or Load macro.

Reshooting individual images with macros

  • Double-check the macro commands, and, when satisfied, click Play to run the macro for only the selected images.
  • Note: If running copy images for a second time, the macro will replace the previous copies in the folder with the new copies.

PhotoRobot macros copy images