
Previous
Ghost Mannequin Photography on a Button-Up Shirt


For this eCommerce fashion photography tutorial, we demonstrate how to use a ghost mannequin with the_Cube and PhotoRobot automation software.
In fashion eCommerce, knowing how to use a ghost mannequin is essential for product photographers. Ghost mannequin photography allows us to photograph clothes as if an invisible model is wearing them. This is thanks to these modular mannequins’ removable pieces in the neck, arm, and chest areas.
Remove different parts according to the clothes you need to photograph, and the mannequin becomes invisible in photos. This produces a more true-to-life, 3D effect, giving clothing a more “full-bodied” and worn appearance. It also provides shoppers of your online fashion store a way to more effectively visualize how products would look on them.
Often, achieving the ghost mannequin effect requires a fair amount of post processing or image compositing techniques. However, with the right modular mannequin and PhotoRobot, even amateur photographers can master the effect in no time. And with no Photoshop required.
In this product photography guide, we’ll demonstrate the process. Learn how to use a ghost mannequin for fashion eCommerce with PhotoRobot’s_Cube and automation software, and what cameras, lighting, and equipment to use.
At the heart of any invisible ghost mannequin photography setup, PhotoRobot deploys the_Cube. This photography robot can quickly transform into a rotating mannequin. It also supports a system for quick mannequin exchange to streamline studio workflow and boost productivity. Simultaneously style clothing on one mannequin while photographing another, and then easily mount the next mannequin for photography.

The_Cube is supported by PhotoRobot editing & automation software. The software provides complete control over cameras, lighting, mannequin rotation, style guides, and much more. Its functions also allow us to drastically reduce time necessary for post-production and time-to-web. Much of this is thanks to PhotoRobot’s Chromakey function, with its automatic background & pole removal. Chromakey also manages image compositing, eliminating the need for heavy editing to achieve the ghost mannequin effect for fashion eCommerce.
In addition to the_Cube, we also use the following equipment to photograph clothes on a ghost mannequin.
Now, when choosing the best ghost mannequin for your brand, first consider the product range you want to photograph. Invisible ghost mannequins come in a wide range of sizes, shapes, and builds, as well as low-end and high-end collections. Some are more budget-friendly, while premium invisible mannequins come with more features but at a higher cost.

Most importantly, the mannequin you choose needs to be the right size and shape for the clothes you’re photographing. Apparel should naturally fit and flow around the contours of the mannequin’s body. That, or you should at least be able to use styling clips and pins to make it fit. The key here is that the mannequin isn’t too large, as this can stretch the fabric of the clothes.
With the right mannequins, then it’s time to consider studio workflow. If photographing coats on a ghost mannequin, the process will be similar to invisible mannequin photography of a blazer. The same is true to photograph a shirt on a ghost mannequin. Each of these products can require similar size mannequin torsos, preparation and styling.
Plan around photographing similar size, shape, and types of apparel for smoother workflow. Also remember that with the_Cube and its system for quick mannequin exchange, you can accomplish more in a single session. Mannequins are easy to unmount and mount from the_Cube, meaning you can spend more time styling clothes.
Next, let’s say we are photographing a zip-up hoodie on a ghost mannequin. The pieces we’ll need to remove from the mannequin will differ from when photographing tight-fitting dresses.

For a zip-up hoodie, we’ll need to remove a chest piece so that the inner lining of the garment is visible in photos. Eliminating this V-shaped piece allows us to take photos of the inside of the jacket.
Decide how many pieces of the mannequin to remove according to how much you want to leave the jacket open in photos. The deeper the opening, the more pieces we remove. Also, consider removing the piece in the pelvic area of the mannequin. This is how to create a subtle flare at the bottom hem of clothing, and works for a wide range of garments.
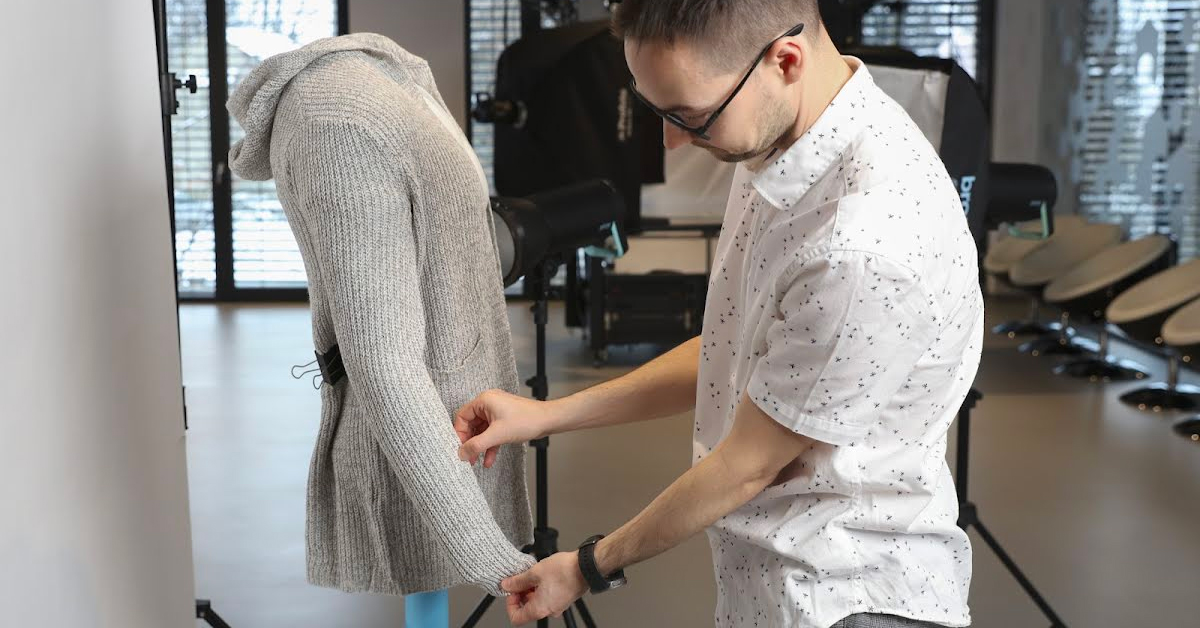
When dressing an invisible mannequin, start first with the sleeves if working with clothing for the upper body. If you’re photographing a cardigan, for example, lightly pull the sleeves over and down the mannequin arms. Straighten the cardigan down and over the body as well.
Then, we need to pay careful attention to the shoulders of the garment. Both shoulders need to look perfectly aligned and neat, with no visible creases or bunching. Also be cautious not to pull the clothing too tightly onto the mannequin, as this can stretch the material of the apparel.
As we dress the mannequin, the invisible model effect is beginning to take shape. We can now see the inner lining of the garment through the open neck and collar. This provides a clear view for capturing photos of our apparel inside and out.
Now, it’s time to style the clothes to perfectly fit the shape and contours of the mannequin. This is when we often use styling clips and pins.
Starting on the backside of the apparel, we identify areas to pull tighter to make the front take on a more fitted look. Often, it’s best to clip the fabric vertically down the center of the backside. This way we avoid creating unnatural creases that make the clothes look less appealing.
When using pins to hold the fabric in place, pin the underside of the garment to hide pins from the cameras. If any areas of the clothing need more “life”, we can also pad the garment with tissue paper to create a more full-bodied appearance.

Ensure the clothing looks natural, neat, and symmetrical on the mannequin, and the job is nearly complete. We can now move onto photographing our product.
And finally, for the easy part - setting the lights and photographing for the ghost mannequin effect. The key with the lighting and exposure is to emphasize areas of the fabric that give more shape to our “invisible model”. We can also use a light reflector to direct light into hard-to-reach areas like the armpits and the gap between the sleeves and torso.
Then, capturing the images takes no time, and the process becomes routine on any mannequin. At the control station, use PhotoRobot_Controls to streamline the photoshoot.
In little time, our results come out professional, consistent, and ready for a quick review before publishing online. We think the results speak for themself.

Make sure to check out the rest of our eCommerce fashion photography tutorials on the ghost mannequin effect. We share not only tips and tricks, but also instructions on how to create the effect on a wide range of different fashion products. The PhotoRobot YouTube channel also has loads of resources to help you develop your product photography techniques.
At PhotoRobot, we strive to help clients achieve consistency in product photography with smoother workflows and enhanced productivity. For more information, simply contact us today to book a demo for your business. From using a ghost mannequin for fashion eCommerce, to photographing products of all sizes, PhotoRobot produces solutions by photographers, for photographers.


